komplete kontrol manual

Komplete Kontrol Manual: A Comprehensive Guide

This manual details Native Instruments’ Komplete Kontrol, covering installation, software setup, DAW integration, and advanced techniques for optimal performance.

Welcome to the world of Komplete Kontrol! This section introduces the core concepts behind Native Instruments’ powerful keyboard controllers and associated software. Komplete Kontrol seamlessly bridges the gap between your virtual instruments and hands-on control, offering an intuitive workflow for music production.

Whether you’re a seasoned producer or just starting, Komplete Kontrol aims to simplify sound design and performance. It’s designed to work flawlessly with Native Instruments’ KOMPLETE suite, but also extends compatibility to numerous third-party plugins adhering to the Native Kontrol Standard (NKS). This guide will equip you with the knowledge to unlock its full potential, from initial setup to advanced customization.

What is Native Instruments Komplete Kontrol?

Komplete Kontrol is more than just a keyboard; it’s a comprehensive software and hardware ecosystem designed by Native Instruments. It centers around a dedicated software instrument browser, providing streamlined access to your entire KOMPLETE library and NKS-compatible plugins. The system intelligently maps parameters, allowing for intuitive control over sounds directly from the keyboard’s controls.

Essentially, Komplete Kontrol transforms your computer into a powerful, tactile sound design workstation. It offers deep integration with popular DAWs, enhancing workflow and creative expression; It’s a central hub for all your virtual instruments, simplifying browsing, tweaking, and performing with your sounds.

Komplete Kontrol Hardware Overview

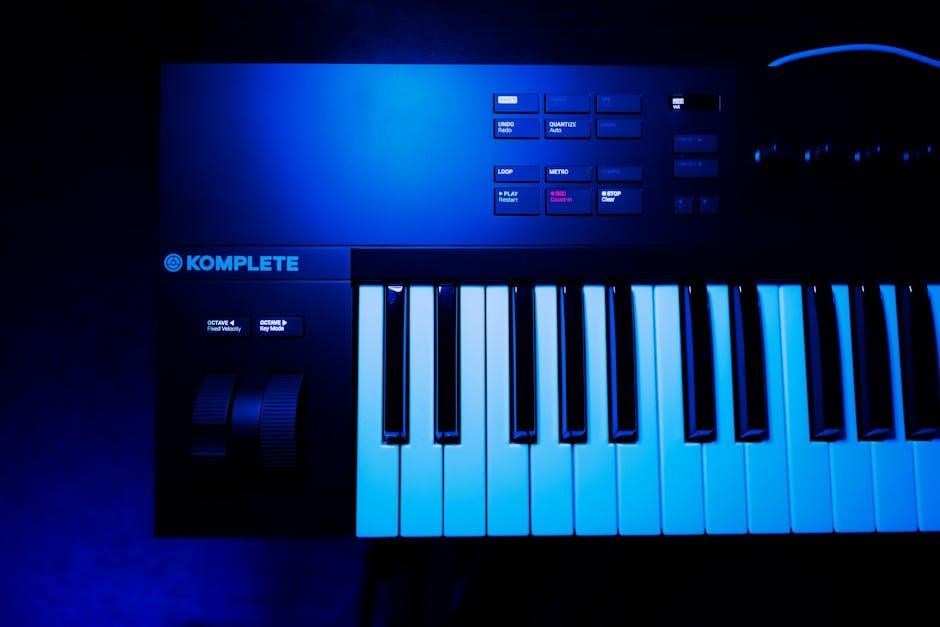
Komplete Kontrol hardware consists of a series of dedicated MIDI keyboards, available in various key sizes and configurations. These keyboards are specifically engineered to work seamlessly with the Komplete Kontrol software. They feature a high-quality keybed, responsive aftertouch, and an array of customizable controls, including knobs, faders, and buttons.

A defining feature is the integrated Light Guide, which visually displays parameter assignments and scales directly on the keys. USB connectivity ensures easy integration with your computer, and the robust build quality guarantees long-lasting performance. The hardware is designed to be a central control surface for your virtual instruments.

Key Features of Komplete Kontrol Keyboards

Komplete Kontrol keyboards boast several key features enhancing workflow and creativity. These include a high-resolution Light Guide visually representing sounds and controls, dynamic keybeds with aftertouch for expressive playing, and dedicated Sound Select and Browser knobs for quick access to presets.

Deep integration with Native Instruments software, plus support for the NKS standard, allows seamless control of third-party plugins. Customizable controls, including knobs, faders, and buttons, offer hands-on manipulation of parameters. USB connectivity provides power and data transfer, ensuring a streamlined setup.

Understanding the Light Guide

The Light Guide is a central feature of Komplete Kontrol keyboards, visually communicating instrument parameters and functions directly on the keys. Each key illuminates to indicate notes, scales, chords, and zones, providing intuitive guidance during performance and sound design.

It dynamically adapts to different modes, such as Scale Mode and Chord Mode, simplifying complex musical ideas. The Light Guide also displays feedback from plugin parameters, offering visual confirmation of adjustments. Customization options allow users to tailor the Light Guide’s behavior to their preferences, enhancing workflow and creative expression.

Software Installation and Setup

Proper software installation is crucial for Komplete Kontrol functionality. Begin by downloading the Komplete Kontrol software from the Native Instruments website, ensuring compatibility with your operating system. The Native Access application manages installation and updates for all Native Instruments products, streamlining the process.

Follow the on-screen instructions during installation, accepting license agreements and selecting the desired installation path. After installation, launch Native Access to activate your Komplete Kontrol software and download any necessary updates. This ensures optimal performance and compatibility with your system and other plugins.

Installing Komplete Kontrol Software

The installation process begins with downloading the Komplete Kontrol software via Native Access. This central hub manages all Native Instruments products, simplifying updates and installations. Ensure you have a stable internet connection throughout the download. Once downloaded, launch the installer and follow the on-screen prompts.

Accept the license agreement and choose your preferred installation directory. Native Access will handle the rest, verifying your product license and installing all necessary components. Post-installation, launch Native Access again to complete the activation process and download any available updates, guaranteeing seamless operation.

Driver Installation and Troubleshooting

Proper driver installation is crucial for Komplete Kontrol functionality. Native Instruments automatically installs the necessary drivers during software setup via Native Access. However, manual driver installation might be needed for older systems or specific configurations. Download the latest drivers from the Native Instruments website, ensuring compatibility with your operating system.

Troubleshooting connectivity issues? First, verify the USB connection. Try a different port or cable. If problems persist, check Device Manager for driver errors. Reinstalling the drivers often resolves conflicts. Consult the Native Instruments support website for detailed troubleshooting guides and FAQs addressing common driver-related problems.

Navigating the Komplete Kontrol Interface

The Komplete Kontrol interface is designed for intuitive sound exploration. The central Browser allows easy access to your Komplete library and NKS-compatible plugins. Utilize the category filters and search function to quickly locate desired sounds. The interface dynamically adapts based on the selected instrument, displaying relevant parameters and controls.

Mastering the interface unlocks its full potential. Familiarize yourself with the various sections, including the parameter view, scale/chord modes, and arpeggiator. Understanding these elements streamlines workflow and enhances creative expression. The visual feedback provided by the Light Guide further simplifies navigation.

Browser Functionality and NKS Standard

The Komplete Kontrol browser is the core of sound selection. It categorizes instruments and presets from Komplete and NKS (Native Kontrol Standard) compatible plugins. NKS ensures consistent parameter mapping and integration, providing a unified browsing experience. Filter by instrument type, tags, or manufacturer to refine your search.

The NKS standard is crucial for seamless integration. Plugins adhering to NKS display detailed information within the browser, including previews and advanced parameter control. This standardization streamlines workflow, allowing you to focus on creativity rather than technical setup. Explore the NKS ecosystem for expanded sonic possibilities.

Preset Management and Organization

Komplete Kontrol offers robust preset management tools. Users can create custom categories and tags to organize their sound library effectively. Favoriting presets provides quick access to frequently used sounds, streamlining workflow during performance or production. The browser allows for efficient searching and filtering based on these user-defined criteria.

Importing and exporting presets is also supported. This facilitates sharing sounds with other users or backing up your custom library. Regularly organizing presets ensures a clutter-free experience, maximizing creative potential and minimizing time spent searching for the perfect sound within Komplete and NKS instruments.

Deep Dive into Key Features

Komplete Kontrol’s core functionality centers around its advanced features. Scale mode allows playing within defined scales, eliminating dissonant notes and fostering melodic creativity. Chord mode simplifies chord progressions, offering various voicings with a single key press. These modes are customizable, adapting to individual musical styles and preferences.

The integrated Arpeggiator and Beat Machine provide rhythmic inspiration. Users can create complex arpeggios and drum patterns with intuitive controls. These features seamlessly integrate with Komplete instruments, offering a dynamic and expressive performance experience, enhancing both live performance and studio production.

Scale and Chord Modes

Scale Mode revolutionizes melodic creation, restricting notes to a chosen scale, preventing accidental dissonances and inspiring harmonic exploration. Users can select from numerous scales, including major, minor, chromatic, and custom scales, tailoring the experience to their musical vision. This feature is invaluable for both beginners and experienced musicians.

Chord Mode simplifies harmonic complexity, allowing users to trigger full chords with single keys. Various chord voicings and inversions are available, offering rich harmonic textures. Customizable chord types and progressions further enhance creative control, streamlining composition and performance workflows.

Arpeggiator and Beat Machine

The integrated Arpeggiator transforms sustained notes into dynamic rhythmic patterns, offering extensive customization options. Users can adjust parameters like rate, octave, pattern, and swing to create intricate arpeggios. Synchronization with the DAW ensures seamless integration with existing projects, enhancing rhythmic possibilities.

Beat Machine mode unlocks percussive creativity, allowing users to trigger drum samples and loops directly from the keyboard. Assigning samples to keys and manipulating parameters like pitch and filter creates unique beats and grooves. This feature expands the Komplete Kontrol’s versatility beyond melodic instruments.

Integration with DAWs

Komplete Kontrol seamlessly integrates with major Digital Audio Workstations (DAWs), streamlining workflow and enhancing creative control. The NKS standard ensures consistent mapping and parameter control across various plugins within the DAW environment. This integration allows for intuitive browsing and manipulation of sounds directly from the keyboard.

Specific integrations exist for Ableton Live and Logic Pro X, offering dedicated control surfaces and enhanced functionality. Beyond these, Komplete Kontrol functions effectively with other DAWs via MIDI mapping, providing a unified experience for music production.

Komplete Kontrol in Ableton Live

Within Ableton Live, Komplete Kontrol unlocks deep integration, offering dedicated control over instruments and effects. The Light Guide visually represents parameters, providing immediate feedback during performance and sound design. Seamless browsing of Komplete libraries and NKS-compatible plugins is achieved directly from the keyboard.

Automatic mapping of controls simplifies workflow, allowing users to focus on creativity rather than technical setup. Komplete Kontrol’s scale and chord modes integrate flawlessly with Ableton’s clip launching and arrangement views, enhancing musical exploration and production efficiency.

Komplete Kontrol in Logic Pro X

Komplete Kontrol’s integration with Logic Pro X streamlines workflow, offering enhanced control over software instruments and effects. The Light Guide dynamically reflects parameter adjustments within Logic, providing visual feedback for intuitive sound shaping. NKS-compatible plugins are easily browsed and loaded directly from the keyboard.

Automatic mapping of controls minimizes setup time, allowing musicians to concentrate on composing and performing. Scale and chord modes work seamlessly within Logic’s environment, inspiring creative exploration and simplifying complex harmonic ideas. This integration boosts productivity and musical expression.

Komplete Kontrol with Other DAWs

Beyond Logic and Ableton, Komplete Kontrol offers broad DAW compatibility, functioning as a powerful MIDI controller. While deep integration features vary, the NKS standard ensures consistent browsing and preset loading across supported platforms. Manual MIDI mapping allows customization for any DAW, unlocking comprehensive control over virtual instruments and effects.

Users can leverage Komplete Kontrol’s scale and chord modes within their preferred digital audio workstation, enhancing creative possibilities. The Light Guide provides visual feedback for parameter adjustments, even without native DAW integration. This versatility makes Komplete Kontrol a central hub for music production.

Advanced Techniques

Mastering Komplete Kontrol unlocks deeper creative potential. Explore utilizing it seamlessly with third-party plugins supporting MIDI Learn, expanding your sound palette beyond Native Instruments’ offerings. Precise MIDI controller mapping is crucial; customize assignments for nuanced control over plugin parameters, tailoring the experience to your workflow.

Experiment with advanced Light Guide configurations for visual feedback on custom mappings. Dive into complex automation possibilities, leveraging Komplete Kontrol’s tactile controls for dynamic performances. These techniques transform Komplete Kontrol from a controller into a personalized production powerhouse.

Using Komplete Kontrol with Third-Party Plugins

Expand Komplete Kontrol’s capabilities by integrating third-party plugins. While optimized for Native Instruments’ instruments, many plugins respond effectively via MIDI Learn. This allows mapping of Komplete Kontrol’s knobs, faders, and keys to control plugin parameters directly.

Ensure the plugin supports MIDI control for seamless integration. Utilize the Light Guide to visually represent mapped parameters, enhancing workflow. Some plugins may require specific configuration within their settings to recognize Komplete Kontrol as a MIDI controller. Experiment to unlock the full potential of your existing plugin library.

Mapping MIDI Controllers

Customize Komplete Kontrol’s functionality by mapping external MIDI controllers. This allows extending control beyond the keyboard itself, integrating hardware synths, drum pads, or other MIDI devices. Access the MIDI Learn mode within Komplete Kontrol’s settings to assign specific controller signals to parameters.

Carefully consider your workflow when assigning controls. Utilize the Light Guide to visually confirm mappings. Remember to save custom mappings as presets for easy recall. This feature unlocks a personalized experience, tailoring Komplete Kontrol to your unique production style and hardware setup.

Troubleshooting Common Issues

Encountering problems? This section addresses frequent issues. Connectivity problems often stem from faulty USB cables or driver conflicts; ensure a secure connection and updated drivers. Software conflicts can arise with other audio interfaces or MIDI devices – try disabling them temporarily.

If Komplete Kontrol isn’t recognized, restart your computer and the software. Check Native Instruments’ support website for known bugs and solutions. Regularly updating both the software and drivers is crucial for stability. Detailed troubleshooting steps and FAQs are available online to resolve most common problems.

Connectivity Problems

Experiencing connection issues? Begin by verifying the USB cable is securely connected to both your Komplete Kontrol keyboard and computer. Try a different USB port, preferably a USB 2.0 port directly on your computer, avoiding hubs. Ensure the correct Komplete Kontrol driver is installed and up-to-date.

If the keyboard isn’t detected, check Device Manager (Windows) or System Information (macOS). A faulty cable is a common culprit. Restarting your computer and the Komplete Kontrol software can often resolve temporary glitches. Consult the Native Instruments support website for specific error codes.

Software Conflicts

Conflicts with other software can sometimes hinder Komplete Kontrol’s performance. Antivirus programs or firewalls might interfere with communication. Temporarily disable them to test if they’re the cause, then add exceptions for Native Instruments applications.

Other MIDI software or virtual instruments could also create conflicts. Close unnecessary programs before launching Komplete Kontrol. Ensure your DAW recognizes Komplete Kontrol as a MIDI input device. Regularly updating both your operating system and Komplete Kontrol software helps minimize compatibility issues. Check the NI forums for known conflicts.

Resources and Support

Native Instruments provides extensive support for Komplete Kontrol users. The Native Instruments Support Website offers a comprehensive knowledge base, FAQs, and troubleshooting guides. You can submit support requests directly through the website for personalized assistance.

Komplete Kontrol Community Forums are a valuable resource for connecting with other users, sharing tips, and finding solutions to common problems. These forums are actively monitored by Native Instruments staff. Additionally, POP-MUSIC offers downloadable instructions in PDF format. Explore these resources to maximize your Komplete Kontrol experience.

Native Instruments Support Website

The official Native Instruments Support Website is the primary hub for Komplete Kontrol assistance. It features a detailed knowledge base filled with articles addressing common issues, installation problems, and software conflicts. Users can find FAQs, troubleshooting guides, and downloadable resources like updated drivers.

Direct support requests can be submitted through the website’s contact form, allowing for personalized assistance from NI’s support team. The site also provides access to product documentation and tutorials, ensuring users have everything needed for a smooth experience. It’s a crucial starting point for resolving any Komplete Kontrol related concerns.

Komplete Kontrol Community Forums

The Native Instruments Komplete Kontrol Community Forums offer a vibrant platform for users to connect, share knowledge, and seek assistance. These forums are populated by experienced users and NI staff, providing a collaborative environment for troubleshooting and discovering new techniques.

Users can find solutions to common problems, discuss advanced workflows, and exchange tips on integrating Komplete Kontrol with various DAWs. The forums are searchable, allowing quick access to relevant discussions. Posting questions and participating in existing threads fosters a supportive community, enhancing the overall Komplete Kontrol experience.

aroma arc 914sbd manual

Aroma Arc 914SBD Manual: A Comprehensive Guide

This guide provides detailed instructions for the Aroma Arc 914SBD rice and grain multicooker‚ ensuring optimal performance and delicious results every time.

Access support and frequently asked questions at AromaCo.com/Support or by calling 1-800-276-6286 for assistance with your appliance.

The Aroma Arc 914SBD is a versatile digital rice and grain multicooker designed for simplicity and convenience. It’s more than just a rice cooker; it’s a kitchen appliance capable of preparing a wide variety of grains and steaming vegetables simultaneously.

This model stands out as a best-value option‚ offering excellent functionality without a hefty price tag. TikTok highlights its ability to deliver real‚ interesting‚ and fun cooking experiences. Whether you’re a seasoned chef or a beginner‚ the Arc 914SBD simplifies meal preparation.

This manual will guide you through each feature‚ from understanding the control panel to mastering various cooking techniques. Download the PDF manual for quick access to all instructions and ensure optimal use of your new appliance.

What’s Included in the Box?

Upon opening your Aroma Arc 914SBD package‚ you should find several key components to get you started. The core of the system is‚ of course‚ the rice and grain multicooker unit itself‚ featuring a cool-touch exterior for safety. Included is the removable‚ non-stick inner cooking pot‚ essential for easy food release and cleaning.

You’ll also receive a glass lid with a vent‚ allowing steam to escape during the cooking process. A steam tray is provided for steaming vegetables‚ fish‚ or other foods alongside your grains. Crucially‚ a rice measuring cup is included for accurate portioning‚ and a serving spatula completes the set.

Refer to the included documentation‚ or AromaCo.com/Support‚ to verify all components are present before first use.

Safety Precautions

To ensure safe operation of your Aroma Arc 914SBD‚ always read these precautions carefully. Never immerse the cooker base in water or other liquids; only the inner pot is designed for such use. Avoid using damaged cords or plugs‚ and do not operate the appliance if it malfunctions.

Keep the cooker on a stable‚ heat-resistant surface‚ away from flammable materials. Exercise extreme caution when handling hot steam or the hot inner pot – always use oven mitts or pot holders. Unplug the cooker when not in use and before cleaning.

This appliance is not intended for use by individuals with reduced physical‚ sensory‚ or mental capabilities‚ or by children without supervision. Refer to the full manual for detailed safety guidelines.

Understanding the Control Panel

The Aroma Arc 914SBD features an intuitive control panel with easily identifiable buttons and a digital display for simplified operation and precise cooking.

Button Functions Explained

The ‘Cook’ button initiates the cooking cycle‚ automatically adjusting temperature and time based on the selected setting. ‘Keep Warm’ activates after cooking‚ maintaining food temperature for hours. ‘Delay Start’ allows pre-programming cooking to begin at a later time‚ offering convenience.

‘Menu’ cycles through various cooking programs – white rice‚ brown rice‚ steam‚ and more – adapting to different grains and dishes. ‘Start/Cancel’ begins or stops the current operation. The control panel’s responsiveness ensures accurate selections.

Understanding each button’s function is crucial for maximizing the Aroma Arc 914SBD’s versatility. Refer to the full manual for detailed program specifics and optimal usage guidelines‚ ensuring perfect results with every meal.

Indicator Light Meanings

The ‘Cook’ light illuminates during the cooking cycle‚ indicating active operation. When cooking is complete‚ it automatically switches to ‘Keep Warm’‚ signified by a corresponding light. A flashing ‘Keep Warm’ light may indicate a potential issue or the need for attention.

‘Delay Start’ illuminates when the timer is set‚ confirming the delayed cooking function is engaged. Any error codes will be displayed via specific light patterns‚ detailed in the comprehensive manual. Understanding these signals is vital for safe and efficient operation.

Consistent monitoring of indicator lights provides real-time feedback on the cooker’s status. Refer to the full manual for a complete decoding of all light combinations and their associated meanings‚ ensuring optimal performance.

Digital Display Overview

The digital display on the Aroma Arc 914SBD provides crucial information during operation. It prominently shows the remaining cooking time‚ counting down from the initially set duration. The display also indicates the selected cooking program – for example‚ ‘White Rice’‚ ‘Brown Rice’‚ or ‘Steam’.

When using the delay start function‚ the display will show the programmed start time. Error messages‚ if any‚ are also communicated through specific codes on the digital screen. Familiarizing yourself with these codes‚ detailed in the manual‚ is essential for troubleshooting.

The brightness and clarity of the display ensure easy readability‚ enhancing the overall user experience. Regularly consult the display to monitor the cooking process and adjust settings as needed.

Cooking with the Aroma Arc 914SBD

Explore versatile cooking options with the Arc 914SBD‚ from fluffy rice and nutritious grains to perfectly steamed vegetables and delicious meals.

Rice Cooking Guide

Preparing Rice with the Aroma Arc 914SBD is simple! Begin by measuring the desired amount of rice and rinsing it thoroughly under cold water until the water runs clear – this removes excess starch for fluffier results.

Add the rinsed rice to the inner pot‚ then add water according to the rice-to-water ratio recommended for your preferred rice type (white‚ brown‚ jasmine‚ etc.). A general guideline for white rice is a 1:1 ratio.

Secure the lid‚ ensuring the steam vent is open. Select the “Rice” function on the control panel and press “Start.” The cooker will automatically switch to the “Keep Warm” mode once cooking is complete.

Allow the rice to rest for 10-15 minutes before fluffing with a fork and serving. Experiment with different water ratios to achieve your ideal rice texture!

Grain Cooking Guide

Expand your culinary options with the Aroma Arc 914SBD’s grain cooking capabilities! This versatile cooker isn’t limited to just rice; it excels at preparing various grains like quinoa‚ oats‚ barley‚ and more.

Similar to rice‚ rinsing grains before cooking is often recommended‚ especially quinoa‚ to remove any natural coating. Add the rinsed grain to the inner pot‚ then add water based on the grain type and desired consistency – consult the grain packaging for specific ratios.

Select the appropriate cooking function (often “Grain” or a similar setting) or use the “White Rice” setting for many grains. Press “Start” and allow the cooker to work its magic.

Once finished‚ let the grain rest‚ covered‚ for 5-10 minutes before fluffing and enjoying a perfectly cooked‚ wholesome meal!

Steaming Function Instructions

Unlock healthy cooking with the Aroma Arc 914SBD’s steaming function! This allows you to prepare vegetables‚ seafood‚ and even desserts without losing vital nutrients.

Ensure sufficient water is in the inner pot – typically 1-2 cups‚ but avoid exceeding the maximum water level mark. Place food in the included steaming basket‚ ensuring it doesn’t touch the water.

Securely position the steaming basket inside the cooker‚ then close the lid. Select the “Steam” function (if available) or use the “White Rice” setting and manually stop the cycle when steaming is complete.

Steaming times vary depending on the food; check for doneness regularly. Enjoy perfectly steamed‚ flavorful‚ and nutritious meals!

Cleaning and Maintenance

Regular cleaning ensures longevity and optimal performance of your Aroma Arc 914SBD. Always unplug the cooker before cleaning any components for safety.

Cleaning the Inner Pot

The inner pot of your Aroma Arc 914SBD is typically non-stick coated‚ requiring gentle cleaning to preserve its integrity. After each use‚ allow the pot to cool completely before washing. Hand washing is highly recommended to avoid scratching the non-stick surface; however‚ it may be dishwasher safe – check your manual for confirmation.

Use a soft sponge or cloth with warm‚ soapy water. Avoid abrasive cleaners or scouring pads‚ as these can damage the coating. For stubborn food residue‚ soak the pot in warm water for a period before washing. Ensure all soap residue is thoroughly rinsed away before the next use. Proper care of the inner pot will extend its lifespan and maintain optimal cooking performance.

Cleaning the Steam Vent and Lid

Regular cleaning of the steam vent and lid is crucial for maintaining the performance and hygiene of your Aroma Arc 914SBD. After each use‚ detach the steam vent and wash it with warm‚ soapy water. Inspect the vent for any blockages caused by starch or food particles and clear them thoroughly. The lid can be wiped down with a damp cloth‚ ensuring no water enters the electronic components.

For a deeper clean‚ the lid may be dishwasher safe – consult your manual. Pay attention to the sealing ring on the lid; remove it periodically and wash it separately to prevent odor buildup. Ensure all parts are completely dry before reassembling. A clean steam vent and lid ensure efficient steaming and prevent potential malfunctions.

Exterior Cleaning Instructions

To maintain the appearance and longevity of your Aroma Arc 914SBD‚ regular exterior cleaning is recommended. Always unplug the rice cooker and allow it to cool completely before cleaning. Wipe down the exterior housing with a soft‚ damp cloth. Avoid using abrasive cleaners or scouring pads‚ as these can damage the finish.

For stubborn stains‚ a mild dish soap solution can be used‚ followed by a clean‚ damp cloth to remove any residue. Never immerse the cooker base in water or any other liquid. Ensure the control panel remains dry during cleaning. Proper exterior care will keep your Aroma Arc 914SBD looking its best and functioning optimally for years to come.

Troubleshooting Common Issues

This section addresses frequent problems with the Aroma Arc 914SBD‚ including power failures‚ burning rice‚ and steaming malfunctions‚ offering quick solutions.

Rice Cooker Not Turning On

Check the Power Cord: Ensure the power cord is securely plugged into both the rice cooker and a functioning wall outlet. A loose connection is a common cause.

Verify Outlet Functionality: Test the outlet with another appliance to confirm it’s providing power. A tripped circuit breaker or blown fuse could be the issue.

Inspect the Power Cord: Examine the power cord for any visible damage‚ such as cuts or fraying. If damaged‚ do not use the cooker and contact customer support.

Reset the Cooker: Unplug the rice cooker for several minutes‚ then plug it back in. This can sometimes reset the internal components.

Lid Properly Secured: The cooker may not operate if the lid isn’t fully and correctly closed. Ensure it clicks into place.

Contact Support: If none of these steps resolve the issue‚ contact Aroma customer support at 1-800-276-6286 for further assistance.

Rice is Burning

Water Ratio: The most frequent cause of burning is an insufficient water-to-rice ratio. Always adhere to the recommended water levels in the cooking guide for your specific rice type.

Rice Variety: Different rice varieties require varying amounts of water. Brown rice generally needs more water than white rice.

Clean Inner Pot: Food residue at the bottom of the inner pot can cause burning. Ensure the pot is thoroughly cleaned after each use.

Check Heating Element: Inspect the heating element for any buildup or damage. A malfunctioning element can cause uneven heating and burning.

Reduce Cooking Time: If burning persists‚ try slightly reducing the cooking time. Monitor closely during the initial adjustment.

Contact Support: For continued issues‚ reach out to Aroma customer support at 1-800-276-6286 for expert guidance and potential repair options.

Steaming Not Working Properly

Water Level: Ensure sufficient water is present in the inner pot to generate steam. Insufficient water will prevent proper steaming function.

Steam Vent: Verify the steam vent and lid are clean and unobstructed. Blockages hinder steam circulation‚ impacting steaming performance.

Steaming Basket: Use the provided steaming basket and avoid overcrowding it. Overcrowding restricts steam flow around the food.

Lid Seal: Confirm the lid is securely sealed to trap steam effectively. A loose lid allows steam to escape‚ reducing steaming efficiency.

Cooking Time: Adjust steaming time based on the food type and quantity. Refer to recipe guidelines for optimal results.

Contact Support: If issues persist‚ contact Aroma customer support at 1-800-276-6286 for troubleshooting assistance and potential solutions.

Additional Features & Tips

Explore the convenient Keep Warm function and utilize the Delay Start timer for perfectly timed meals with your Aroma Arc 914SBD multicooker.

Keep Warm Function Details

The Aroma Arc 914SBD’s Keep Warm function automatically activates after the cooking cycle is complete‚ maintaining your rice or grains at an optimal serving temperature. This feature ensures your food stays warm and fluffy for extended periods without overcooking or drying out.

The Keep Warm cycle can safely hold cooked food for up to 12 hours‚ providing flexibility for meal planning and serving. It’s ideal for busy schedules or when you’re entertaining guests. Remember that prolonged warming may slightly alter the texture of certain grains‚ but it will remain safe to eat.

To deactivate the Keep Warm function‚ simply unplug the rice cooker or press the ‘Cook’ button again. Always practice safe food handling procedures when leaving cooked food in the Keep Warm mode for extended durations.

Delay Start Timer Usage

The Aroma Arc 914SBD features a convenient Delay Start timer‚ allowing you to schedule cooking in advance. This is perfect for preparing meals while you’re away or ensuring a hot breakfast is ready when you wake up. To utilize this function‚ press the ‘Delay Start’ button and set the desired cooking delay time in hours.

The delay time can range from 30 minutes up to 24 hours‚ offering considerable flexibility. Once set‚ the rice cooker will automatically begin the cooking cycle at the programmed time. Ensure ingredients are properly measured and added before setting the delay timer.

For food safety‚ avoid delaying the start of cooking with perishable ingredients for extended periods. Always double-check the timer setting before leaving the appliance unattended.

Recipe Ideas for the Arc 914SBD

Beyond basic rice‚ the Aroma Arc 914SBD excels at diverse recipes! Try a creamy risotto using the ‘Grain’ setting‚ or explore flavorful pilafs with added vegetables and broth. The steaming function is ideal for perfectly cooked salmon or tender chicken breasts‚ paired with your rice dish.

Experiment with quinoa‚ barley‚ and other grains for healthy and satisfying meals. Consider a hearty jambalaya‚ utilizing the cooker’s ability to simmer and combine flavors. For a quick dessert‚ try a simple rice pudding‚ sweetened with cinnamon and raisins.

Online resources offer countless recipes specifically tailored for multi-cookers like the Arc 914SBD‚ expanding your culinary possibilities.

Technical Specifications

The Aroma Arc 914SBD requires standard household power and boasts a generous capacity for family meals. Detailed dimensions and weight information are readily available.

Power Requirements

Understanding the electrical needs of your Aroma Arc 914SBD is crucial for safe and efficient operation. This multicooker is designed for standard household electrical systems‚ typically operating on 120 Volts and 60 Hertz. The power consumption is rated at a modest wattage‚ ensuring it won’t overload standard circuits.

Always verify that your outlet voltage matches the cooker’s requirements before plugging it in to prevent damage. Using an incorrect voltage can void the warranty and pose a safety hazard. The appliance is equipped with a standard three-prong grounded plug for enhanced safety. Do not attempt to modify the plug or use extension cords unless absolutely necessary‚ and then only with appropriate amperage ratings.

Proper grounding is essential to minimize the risk of electrical shock.

Capacity Details

The Aroma Arc 914SBD boasts a generous cooking capacity‚ making it ideal for families or meal prepping. Its inner pot can effectively cook up to 8 cups of uncooked rice‚ which translates to approximately 16 cups of cooked rice – perfect for larger gatherings or leftovers.

Beyond rice‚ this versatile cooker handles grains with similar efficiency. You can comfortably cook quinoa‚ oats‚ or other grains in comparable quantities. The steamer tray allows for simultaneous food preparation‚ enabling you to steam vegetables‚ fish‚ or poultry while the rice or grains cook below.

Consider the fill lines marked inside the inner pot to avoid overfilling and ensure optimal cooking results. Proper capacity management maximizes performance and prevents potential messes.

Dimensions and Weight

The Aroma Arc 914SBD is designed with a compact footprint‚ making it suitable for various kitchen spaces. Its dimensions are approximately 14.2 x 8.7 x 11.8 inches‚ allowing it to fit comfortably on countertops without taking up excessive room.

Weighing in at around 6.6 pounds‚ the rice cooker is lightweight and easy to move or store when not in use. The cool-touch exterior and integrated handles further enhance portability and safety.

These dimensions and weight considerations are crucial for those with limited kitchen space or who prefer appliances that are easy to handle. Its manageable size doesn’t compromise its 8-cup capacity‚ offering a balance of functionality and convenience.

2011 ford fusion owners manual

This manual provides essential information for 2011 Ford Fusion owners‚ covering operation‚ maintenance‚ and detailed component specifics for optimal vehicle performance.

Overview of the Manual’s Purpose

This 2011 Ford Fusion Owner’s Manual serves as a comprehensive guide‚ designed to familiarize owners with their vehicle’s features and operational procedures. It details everything from basic driving instructions and routine maintenance schedules to in-depth explanations of the vehicle’s systems.

The manual aims to promote safe and efficient vehicle operation‚ while also assisting owners in understanding potential issues and performing basic troubleshooting. It includes details on the audio system‚ keyless entry‚ and‚ if equipped‚ the navigation system. Furthermore‚ it outlines warranty coverage and owner responsibilities‚ ensuring a positive ownership experience.

Important Safety Precautions

Prioritize safety when operating your 2011 Ford Fusion. This manual highlights crucial precautions to prevent injury or damage. Always adhere to traffic laws and wear seatbelts. Never operate the vehicle under the influence of drugs or alcohol.

Be aware of dashboard symbols and indicators‚ responding promptly to warnings. Proper maintenance‚ as outlined within‚ is vital for safe operation. Understand jump-starting procedures and roadside assistance information for emergencies. This manual emphasizes responsible vehicle ownership‚ ensuring the well-being of yourself and others on the road.

Understanding Your Vehicle

Explore key features of your 2011 Ford Fusion‚ including the VIN location‚ dashboard symbols‚ and the functionality of the keyless entry system.

Vehicle Identification Number (VIN) Location

Locating your 2011 Ford Fusion’s Vehicle Identification Number (VIN) is crucial for various reasons‚ including warranty claims‚ theft recovery‚ and vehicle history reports. The primary location for the VIN is on the driver’s side dashboard‚ visible through the windshield. You’ll find it on a metal plate affixed to the instrument panel.

Additionally‚ the VIN is also stamped on the driver’s side doorjamb sticker. This sticker contains important information about the vehicle’s manufacturing details and original specifications. Keeping a record of your VIN is highly recommended for easy access when needed.

Dashboard Symbols and Indicators

Understanding the dashboard symbols in your 2011 Ford Fusion is vital for safe operation. These indicators provide crucial information about your vehicle’s systems. Warning lights‚ like the check engine light‚ require immediate attention. Indicator lights‚ such as turn signals‚ confirm system activation.

Familiarize yourself with symbols for low fuel‚ oil pressure‚ battery voltage‚ and brake system warnings. Refer to your owner’s manual for a comprehensive explanation of each symbol. Ignoring illuminated warning lights can lead to more significant mechanical issues and compromise safety.

Keyless Entry and Remote Start System

The 2011 Ford Fusion may be equipped with a keyless entry and remote start system for enhanced convenience and security. This system allows you to unlock doors and start the engine without physically inserting the key. Programming additional remote transmitters requires a specific procedure outlined in the owner’s manual.

Ensure the key fob battery is functioning correctly for optimal performance. Remote start functionality may have distance and operational limitations. Always prioritize safety and be aware of your surroundings when utilizing these features.

Operating Your 2011 Ford Fusion

This section details the proper procedures for starting‚ stopping‚ driving‚ and fueling your 2011 Ford Fusion‚ ensuring safe and efficient operation.

Starting and Stopping the Engine

To start your 2011 Ford Fusion‚ ensure the vehicle is in Park or Neutral‚ fully depress the brake pedal‚ and turn the ignition key to the ‘Start’ position‚ releasing it once the engine ignites. Avoid prolonged cranking.

For stopping the engine‚ gently apply the brake pedal to bring the vehicle to a complete halt‚ shift the transmission into Park‚ and turn the ignition key to the ‘Off’ position. Always engage the parking brake‚ especially on inclines. Familiarize yourself with these procedures for safe and reliable operation of your vehicle.

Driving Modes and Transmission Operation

Your 2011 Ford Fusion’s transmission offers various driving modes‚ typically including Park‚ Reverse‚ Neutral‚ Drive‚ and potentially a manual shift mode (SelectShift). To shift gears‚ firmly press the brake pedal and move the gear selector to the desired position.

SelectShift allows manual control‚ upshifting and downshifting via steering wheel-mounted paddles or the gear selector. Understand the function of each mode for optimal performance and fuel efficiency. Avoid abrupt shifting and always ensure a complete stop before changing between Drive and Reverse.

Fueling and Fluid Checks

Regularly check fluid levels – engine oil‚ coolant‚ brake fluid‚ power steering fluid‚ and windshield washer fluid – using the dipsticks and reservoirs. Refer to the ‘Fluid Specifications and Capacities’ section for correct types.

For fueling‚ use the recommended octane rating specified on the fuel filler door. Always turn off the engine before refueling and avoid overfilling the tank. Inspect fuel lines and caps for damage. Promptly address any leaks or low fluid levels to maintain optimal vehicle operation and prevent potential damage.

Maintenance and Care

Consistent maintenance‚ following the recommended schedule‚ ensures your 2011 Ford Fusion operates reliably and safely‚ preserving its value over time.

Recommended Maintenance Schedule

Your 2011 Ford Fusion’s longevity depends on adhering to a strict maintenance plan. Regularly scheduled services‚ detailed in the owner’s manual‚ are crucial. Key intervals include oil and filter changes – typically every 5‚000 to 7‚500 miles with synthetic blend oil. Tire rotations should occur every 8‚000 miles to ensure even wear.

Inspect brake pads‚ rotors‚ and fluid levels routinely. Fluid checks encompass coolant‚ brake fluid‚ power steering‚ and windshield washer fluid. A more comprehensive inspection‚ including belts‚ hoses‚ and filters‚ is recommended at 30‚000‚ 60‚000‚ and 100‚000-mile intervals. Following this schedule maximizes performance and minimizes unexpected repairs.

Fluid Specifications and Capacities

Maintaining correct fluid levels is vital for your 2011 Ford Fusion. Engine oil capacity varies by engine – 1.6L takes approximately 4.5 quarts‚ the 2.0L around 4.5 quarts‚ and the 2;5L requires about 5.7 quarts‚ using 5W-20 oil. The cooling system needs a 50/50 mix of coolant and distilled water‚ holding roughly 12.8 quarts.

Power steering fluid should be Ford’s specific fluid; capacity is around 0.8 gallons. Brake fluid must meet DOT 3 specifications. Transmission fluid requirements depend on the transmission type; consult the manual for specifics. Always verify capacities before adding fluids to avoid overfilling.

Tire Information and Maintenance

Proper tire care enhances safety and extends tire life on your 2011 Ford Fusion. Recommended tire pressure is typically 32 PSI for most trims‚ but check the sticker on the driver’s side doorjamb for precise values. Regularly inspect tires for wear‚ damage‚ and proper inflation. Rotate tires every 5‚000-7‚500 miles to ensure even wear.

Tire size varies depending on the model‚ but common sizes include 215/60R16 and 225/50R17. Always replace tires in pairs or all four for balanced handling. Inspect tread depth frequently using a tread depth gauge.

In-Car Technology

The 2011 Ford Fusion features an audio system‚ optional navigation‚ and Bluetooth connectivity for hands-free calling and audio streaming convenience.

Audio System and Controls

Your 2011 Ford Fusion’s audio system delivers quality sound through strategically placed speakers. Controls are intuitively designed for ease of use while driving. The system typically includes an AM/FM radio‚ a CD player‚ and an auxiliary input jack for connecting external devices like MP3 players or smartphones.

Volume and tuning are adjusted via steering wheel-mounted controls or the central display screen. Explore features like preset station memory and sound equalization settings to personalize your listening experience. Refer to the owner’s manual for detailed instructions on navigating all audio system functions and maximizing sound quality within your Fusion.

Navigation System (If Equipped)

If your 2011 Ford Fusion is equipped with a navigation system‚ it offers turn-by-turn directions and points of interest. The system utilizes a map database‚ typically displayed on a central screen‚ and requires periodic updates to maintain accuracy. Input destinations using voice commands or the touchscreen interface.

Familiarize yourself with features like route options‚ traffic avoidance‚ and map viewing modes. The owner’s manual provides detailed instructions on system operation‚ map updates‚ and troubleshooting common issues. Ensure proper antenna reception for optimal navigation performance during your travels.

Bluetooth Connectivity

Your 2011 Ford Fusion may feature Bluetooth technology‚ enabling wireless connection of compatible mobile phones and audio devices. Pairing a device involves a simple process outlined in the owner’s manual‚ typically accessed through the vehicle’s audio system settings. Once connected‚ you can make and receive calls hands-free‚ and stream audio wirelessly.

The system supports multiple paired devices‚ but only one can be actively connected at a time. Refer to the manual for instructions on managing paired devices and troubleshooting connectivity issues. Ensure your device is discoverable for successful pairing.

Troubleshooting and Emergency Assistance

This section details jump-starting‚ basic troubleshooting steps‚ and vital roadside assistance contact information for your 2011 Ford Fusion.

Jump Starting Procedures

If your 2011 Ford Fusion battery is depleted‚ a jump start can help. First‚ position a second vehicle close enough for the jumper cables to reach‚ but do not let the vehicles touch. Connect the positive (+) cable to the positive terminal of the discharged battery‚ then to the positive terminal of the good battery. Next‚ connect the negative (-) cable to the negative terminal of the good battery‚ and then to a clean‚ unpainted metal surface on your Fusion’s engine block – away from the battery. Start the good vehicle‚ let it run for a few minutes‚ then attempt to start your Fusion. Disconnect the cables in the reverse order of connection.

Basic Troubleshooting Guide

Experiencing issues with your 2011 Ford Fusion? First‚ check simple things like the fuel level and ensure all lights are off. If the engine won’t start‚ verify the battery connections are secure. For audio system problems‚ check the volume and source selection. A malfunctioning keyless entry system might require a new key fob battery. If warning lights illuminate‚ consult the “Dashboard Symbols and Indicators” section of this manual. Remember‚ this guide offers basic solutions; for complex issues‚ professional diagnosis is recommended to avoid further damage.

Roadside Assistance Information

Need help on the road with your 2011 Ford Fusion? Ford provides comprehensive roadside assistance services. Contact them via the Ford Motor Company website or by phone for services like towing‚ jump starts‚ tire changes‚ and fuel delivery. Ensure you have your Vehicle Identification Number (VIN) readily available when calling. Coverage details and limitations apply‚ so review your warranty information. For immediate emergencies‚ always prioritize safety and contact local emergency services. Remember to keep the roadside assistance contact information easily accessible within your vehicle.

Detailed Component Information

This section details the 2011 Ford Fusion’s engine specs (1.6L‚ 2.0L‚ 2.5L)‚ brake system‚ and cooling system for in-depth understanding.

Engine Specifications (1.6L‚ 2.0L‚ 2.5L)

The 2011 Ford Fusion offered three engine choices. The 1.6L Duratec produced 120 horsepower and 115 lb-ft of torque‚ prioritizing fuel efficiency. The 2.0L Duratec delivered 160 horsepower and 137 lb-ft of torque‚ balancing power and economy. Finally‚ the 2.5L Duratec V6 generated 175 horsepower and 172 lb-ft of torque‚ offering robust performance.

These engines utilized various technologies for optimal operation. Understanding your specific engine’s specifications is crucial for proper maintenance and maximizing its lifespan. Refer to your vehicle identification number (VIN) to confirm your engine type and associated details within this manual.

Brake System Overview

The 2011 Ford Fusion features a hydraulic brake system with front vented discs and rear drum brakes (or rear discs on some models). This system incorporates Anti-lock Braking System (ABS) technology‚ enhancing control during emergency stops and slippery conditions. Electronic Brakeforce Distribution (EBD) optimizes braking force to each wheel.

Regular inspection of brake pads‚ rotors‚ and fluid levels is vital for safe operation. This manual details the recommended maintenance schedule for the brake system. Familiarize yourself with the brake warning lights on the dashboard‚ indicating potential issues requiring immediate attention and professional service.

Cooling System Details

The 2011 Ford Fusion’s cooling system regulates engine temperature‚ preventing overheating and ensuring optimal performance. It comprises a radiator‚ water pump‚ thermostat‚ coolant hoses‚ and a coolant reservoir. The system circulates a mixture of water and ethylene glycol-based coolant to absorb engine heat.

Maintaining the correct coolant level and condition is crucial. Regularly check the coolant reservoir and inspect hoses for leaks or damage. This manual specifies the correct coolant type and provides instructions for flushing and refilling the system. Ignoring cooling system maintenance can lead to severe engine damage.

Warranty Information

Ford Warranty Coverage details the terms and conditions protecting your 2011 Fusion‚ alongside Owner Responsibilities for maintaining valid coverage.

Ford Warranty Coverage

Ford’s comprehensive warranty for the 2011 Fusion offers peace of mind‚ covering defects in materials and workmanship. This includes a basic bumper-to-bumper warranty‚ a powertrain warranty focusing on engine and transmission‚ and a separate coverage for corrosion. Specific durations and mileage limits apply to each component‚ detailed within the official warranty document.

Coverage begins on the original in-service date. Transferability to subsequent owners may be subject to specific conditions. Maintaining proper vehicle maintenance‚ as outlined in the owner’s manual‚ is crucial for warranty validity. Refer to the warranty guide for complete details and exclusions.

Owner Responsibilities

As a 2011 Ford Fusion owner‚ maintaining your vehicle is paramount for optimal performance and warranty coverage. This includes adhering to the recommended maintenance schedule‚ utilizing specified fluids‚ and promptly addressing any identified issues. Regular inspections‚ fluid level checks‚ and tire maintenance are crucial.

Keep detailed records of all service performed. Proper vehicle operation‚ avoiding misuse‚ and following safety precautions are also owner responsibilities. Failure to maintain the vehicle appropriately may void certain warranty claims. Consult the owner’s manual for complete guidelines.

gm service manual

GM service manuals are vital resources for vehicle maintenance and repair‚ offering detailed guidance for Chevrolet‚ Buick‚ GMC‚ and Cadillac models.

What is a GM Service Manual?

A GM Service Manual is a comprehensive‚ technically detailed guide created by General Motors (GM) to assist technicians and knowledgeable vehicle owners in understanding‚ diagnosing‚ repairing‚ and maintaining GM vehicles. These manuals encompass a wide range of information‚ from basic maintenance procedures like oil changes and tire rotations to complex repairs involving engines‚ transmissions‚ and electrical systems.

They often include detailed specifications‚ torque values‚ wiring diagrams‚ and step-by-step instructions‚ ensuring repairs are performed correctly and safely. These resources are essential for anyone working on GM cars‚ trucks‚ and SUVs.

Importance of Using Official Manuals

Utilizing official GM Service Manuals is crucial for accurate and safe vehicle repairs. These manuals provide GM-approved procedures‚ ensuring work aligns with manufacturer standards‚ preventing potential damage‚ and maintaining vehicle warranty coverage. Relying on unofficial sources can lead to incorrect repairs‚ safety hazards‚ and costly mistakes.

Official manuals offer precise specifications‚ diagnostic flowcharts‚ and detailed illustrations‚ minimizing guesswork and maximizing repair effectiveness. They are an investment in vehicle longevity and reliability.

Types of GM Service Manuals

GM service manuals come in various formats‚ including factory manuals‚ Haynes‚ and Chilton publications‚ each offering different levels of detail and accessibility.

Factory Service Manuals

Factory service manuals‚ published by General Motors‚ represent the most comprehensive source of information for vehicle repair. These manuals‚ often extensive – like the 800-page 1975 Pontiac Astre manual – cover specifications‚ maintenance procedures‚ detailed diagnostics‚ and complete in-vehicle repair instructions. They are created by the manufacturer‚ ensuring accuracy and providing insights directly from the engineering teams.

These manuals are considered the gold standard for professional technicians and serious DIY enthusiasts‚ offering unparalleled depth and detail for all GM vehicle systems.

Haynes Manuals

Haynes Manuals offer a more accessible and user-friendly alternative to factory service manuals for GM vehicle owners. Haynes provides owner workshop manuals designed for servicing and auto repairs‚ covering a wide range of popular makes and models‚ including Chevrolet and GMC. These manuals simplify complex procedures with step-by-step instructions and helpful photographs.

They are readily available for purchase and shipping across North America‚ catering to both experienced mechanics and those new to vehicle maintenance.

Chilton Manuals

Chilton Manuals historically provided comprehensive service and repair information for General Motors automobiles. Available through resources like the Internet Archive‚ these manuals cover maintenance procedures and repair techniques for various GM vehicles. Chilton manuals‚ like the 2005-2008 models‚ were often geared towards professional technicians‚ though accessible to dedicated DIYers.

They offer detailed guidance‚ though may lack the hyperlinking and digital features of modern service information systems.

Historical Overview of GM Service Manuals

GM service manuals evolved from basic guides to detailed‚ comprehensive resources‚ and now include digital formats like SI software‚ reflecting advancements in automotive technology.

Early Manuals (Pre-1970s)

Early GM service manuals‚ preceding the 1970s‚ were considerably less detailed than their modern counterparts. These initial publications primarily focused on fundamental maintenance procedures and basic repair instructions. Illustrations were often simplistic‚ and technical specifications were comparatively limited.

They served as essential guides for mechanics‚ but lacked the in-depth diagnostic information and intricate wiring diagrams found in later editions. These manuals were often vehicle-specific‚ catering to individual models and their unique characteristics‚ providing a foundational level of support for automotive service.

The Rise of Detailed Manuals (1970s-1990s)

From the 1970s through the 1990s‚ GM service manuals underwent a significant transformation‚ becoming increasingly comprehensive. This era witnessed a surge in automotive complexity‚ demanding more detailed repair information. Manuals expanded in size‚ incorporating extensive diagnostic procedures‚ intricate wiring diagrams‚ and detailed component illustrations.

Torque specifications became standardized‚ and in-vehicle repair instructions were presented with greater clarity. These manuals catered to professional technicians‚ offering the depth needed to address increasingly sophisticated vehicle systems and technologies.

Digital Service Information (2000s, Present)

The 2000s marked a pivotal shift towards digital GM service information‚ exemplified by the introduction of the SI (Service Information) system. This software offered hyperlinked diagrams and text‚ enhancing navigation and accessibility. Online subscription services became prevalent‚ providing technicians with up-to-date repair data and technical bulletins.

Digital formats enabled faster updates and broader coverage‚ moving beyond traditional printed manuals. SI software features streamlined diagnostics and repair processes‚ improving efficiency and accuracy.

Content Found in a Typical GM Service Manual

GM service manuals comprehensively cover specifications‚ maintenance schedules‚ diagnostic procedures‚ and detailed in-vehicle repair instructions for optimal vehicle performance and longevity.

Specifications and Torque Values

GM service manuals dedicate significant sections to precise specifications‚ crucial for correct repairs; These include engine data like compression ratios and bore sizes‚ alongside transmission details and fluid capacities.

Critically‚ manuals list accurate torque values for every fastener – bolts‚ nuts‚ and screws – preventing damage from over or under-tightening.

This ensures component integrity and safety. Detailed charts specify torque sequences and procedures‚ vital for proper assembly and preventing future failures. Ignoring these values can lead to costly rework and potential hazards.

Maintenance Schedules

GM service manuals provide comprehensive maintenance schedules tailored to specific vehicle models and driving conditions. These schedules detail routine checks and services‚ categorized by mileage or time intervals.

Items include oil and filter changes‚ fluid level inspections‚ tire rotations‚ and brake system evaluations.

Following these schedules proactively prevents major repairs‚ extends vehicle lifespan‚ and maintains optimal performance. Manuals often differentiate between ‘normal’ and ‘severe’ driving conditions‚ adjusting intervals accordingly for increased reliability.

Diagnostic Procedures

GM service manuals outline systematic diagnostic procedures for identifying vehicle issues. These procedures guide technicians through a logical process of symptom analysis‚ component testing‚ and fault code interpretation.

Manuals detail the use of diagnostic tools‚ like scan tools‚ to retrieve trouble codes and monitor system parameters.

Flowcharts and step-by-step instructions help pinpoint the root cause of problems efficiently‚ reducing unnecessary repairs and ensuring accurate solutions for optimal vehicle functionality.

In-Vehicle Repair Instructions

GM service manuals provide comprehensive‚ step-by-step instructions for performing in-vehicle repairs. These instructions cover a wide range of procedures‚ from simple component replacements to complex system overhauls.

Detailed illustrations and diagrams accompany the text‚ clarifying each step and ensuring proper execution.

Torque specifications‚ wiring diagrams‚ and safety precautions are prominently featured‚ guaranteeing repairs are completed correctly and safely‚ maintaining vehicle integrity and performance.

Accessing GM Service Manuals

GM service manuals are available through physical purchases‚ online subscription services like SI‚ and occasionally free resources such as the Internet Archive.

Purchasing Physical Copies

GM service manuals in physical form‚ like the 1975 Pontiac Astre manual‚ offer a tangible resource for mechanics and enthusiasts. These comprehensive volumes‚ often exceeding 800 pages‚ detail specifications‚ maintenance procedures‚ diagnostics‚ and in-vehicle repair instructions.

Finding these manuals can involve searching online marketplaces‚ automotive bookstores‚ or specialized retailers. Older manuals may be available used‚ while current models are typically ordered directly from GM or authorized distributors. Consider the vehicle’s year and model when searching to ensure compatibility and accuracy.

Online Subscription Services

GM Service Information (SI) offers a robust online subscription service providing access to the latest repair procedures‚ wiring diagrams‚ and technical bulletins. The SI software features hyperlinked information‚ connecting text directly to relevant illustrations and figures‚ enhancing user understanding.

These subscriptions are geared towards professional technicians‚ offering comprehensive data for all GM divisions. Familiarizing oneself with the SI system’s format is crucial for effective troubleshooting and repair‚ ensuring accurate and efficient service.

Free Online Resources (Internet Archive)

The Internet Archive provides a valuable‚ albeit potentially incomplete‚ resource for locating older GM service manuals. Chilton’s General Motors service manuals‚ spanning various years and models‚ are available for free download‚ borrowing‚ or streaming.

These digitized manuals cover maintenance and repair procedures for numerous GM automobiles. However‚ users should be aware that the availability and quality of these resources can vary‚ and may not always be the most up-to-date information.

Understanding GM Service Manual Format

GM service manuals utilize detailed wiring diagrams‚ comprehensive illustrations‚ and‚ in modern SI Software‚ hyperlinked information for efficient repair procedures.

Wiring Diagrams

GM service manuals prominently feature detailed wiring diagrams crucial for diagnosing and repairing electrical issues. These diagrams illustrate the complex network of wires‚ connectors‚ and components within a vehicle. They provide a visual roadmap for tracing circuits‚ identifying shorts or opens‚ and understanding the flow of electricity.

Effective use of these diagrams requires understanding electrical symbols and color codes. Modern manuals‚ particularly those accessed through the SI Software‚ often offer interactive diagrams allowing users to trace wires and pinpoint specific components. Accurate interpretation of these diagrams is essential for safe and successful electrical repairs‚ preventing further damage and ensuring proper functionality.

Illustrations and Figures

GM service manuals heavily rely on detailed illustrations and figures to clarify complex repair procedures. These visuals depict component locations‚ disassembly sequences‚ and assembly steps‚ supplementing written instructions. They are invaluable for visualizing how parts fit together and understanding the mechanics of a repair.

Modern SI Software enhances these visuals with interactive features; users can zoom‚ rotate‚ and even view exploded diagrams. These illustrations are often hyperlinked to related text‚ providing seamless access to additional information. Properly utilizing these visual aids significantly improves repair accuracy and efficiency‚ minimizing errors and saving time.

Hyperlinked Information (SI Software)

GM’s Service Information (SI) Software revolutionized access to repair data through extensive hyperlinking. Within the digital manuals‚ text‚ illustrations‚ and wiring diagrams are interconnected‚ allowing technicians to navigate seamlessly between related information. This feature eliminates the need for constant cross-referencing‚ drastically reducing diagnostic and repair times.

SI figures are directly linked to the corresponding textual explanations‚ providing instant clarification. This interconnected system ensures users can quickly grasp complex procedures and access all relevant details‚ enhancing accuracy and efficiency in vehicle servicing.

Specific GM Divisions Covered

GM service manuals comprehensively cover vehicle repair for Chevrolet‚ GMC‚ Buick‚ and Cadillac divisions‚ ensuring detailed guidance for all General Motors brands.

Chevrolet Service Manuals

Chevrolet service manuals‚ like those from Haynes Manuals North America‚ are essential for owners and professional technicians alike. These manuals provide detailed instructions for servicing and auto repairs across all popular Chevrolet makes and models. Covering everything from routine maintenance to complex diagnostics‚ they ensure proper vehicle upkeep.

Owners can find guidance on specifications‚ maintenance schedules‚ and in-vehicle repair procedures. Accessing these resources‚ whether through physical copies or online subscriptions‚ empowers individuals to confidently tackle repairs and maintain their Chevrolet vehicles effectively.

GMC Service Manuals

GMC service manuals‚ readily available through sources like Haynes Manuals North America‚ are indispensable tools for GMC vehicle owners and mechanics. These manuals offer comprehensive instructions for servicing and performing auto repairs on all popular GMC models. They detail procedures for maintenance‚ diagnostics‚ and intricate repairs‚ ensuring optimal vehicle performance.

Whether you need to address routine upkeep or tackle complex issues‚ GMC service manuals provide the necessary guidance. Accessing these resources‚ in physical or digital formats‚ empowers users to maintain their GMC vehicles with confidence and expertise.

Buick Service Manuals

Buick service manuals are essential resources for maintaining and repairing Buick vehicles‚ providing detailed instructions for both routine maintenance and complex repairs. These manuals‚ often available through various providers‚ cover a wide range of Buick models and model years. They empower owners and professional technicians alike to diagnose issues accurately and implement effective solutions.

Access to Buick service manuals ensures proper vehicle upkeep‚ contributing to longevity and optimal performance. Whether physical copies or digital subscriptions‚ these guides are invaluable for any Buick enthusiast or mechanic.

Cadillac Service Manuals

Cadillac service manuals represent a crucial resource for owners and technicians dedicated to the upkeep of these luxury vehicles. These manuals deliver comprehensive guidance‚ spanning from scheduled maintenance procedures to intricate diagnostic and repair processes. Accessing these resources‚ whether in physical form or via digital subscriptions‚ ensures accurate and effective vehicle servicing.

Detailed illustrations and specifications within Cadillac manuals promote proper repair techniques‚ preserving the vehicle’s performance and value. They are indispensable for maintaining Cadillac’s renowned quality.

Using Service Manuals for Specific Repairs

GM service manuals expertly guide repairs‚ from engine and transmission overhauls to complex brake system work‚ ensuring accurate procedures and optimal results.

Engine Repair

GM service manuals provide comprehensive engine repair procedures‚ covering everything from basic maintenance like oil changes and spark plug replacements to intricate tasks such as cylinder head removal and engine rebuilding. Detailed diagrams illustrate component locations and assembly‚ while precise torque specifications prevent damage.

Troubleshooting sections guide technicians through diagnostic flowcharts to pinpoint issues‚ aided by trouble code definitions. Manuals detail valve adjustments‚ timing procedures‚ and fuel system repairs‚ ensuring accurate and efficient engine restoration. They are indispensable for both novice and experienced mechanics working on GM vehicles.

Transmission Repair

GM service manuals offer detailed instructions for transmission repair‚ encompassing both automatic and manual transmissions found across various GM vehicle lines. They cover disassembly‚ inspection‚ and reassembly procedures‚ highlighting critical components like clutches‚ bands‚ and valve bodies.

Specific torque specifications and fluid level guidelines are provided to ensure proper operation. Diagnostic charts assist in identifying transmission issues‚ while exploded views simplify parts identification. These manuals are essential for accurate repairs‚ extending transmission life and restoring vehicle performance.

Brake System Repair

GM service manuals provide comprehensive guidance for brake system repairs‚ covering hydraulic and mechanical components. Detailed procedures outline the removal‚ inspection‚ and replacement of brake pads‚ rotors‚ calipers‚ and wheel cylinders.

Manuals specify correct torque values for brake line fittings and caliper mounting bolts‚ crucial for safety. Diagnostic flowcharts aid in pinpointing issues like leaks‚ worn components‚ or ABS malfunctions. Illustrations clarify component locations and assembly‚ ensuring accurate and safe brake system restoration.

GM Service Information (SI) System

GM’s SI System delivers digital access to service manuals‚ wiring diagrams‚ and diagnostic information‚ featuring hyperlinked illustrations for efficient repair procedures.

SI Software Features

GM’s SI software boasts a comprehensive suite of features designed to streamline the repair process. Users benefit from detailed wiring diagrams‚ interactive troubleshooting guides‚ and access to the latest technical service bulletins. The system’s hyperlinked format allows for seamless navigation between text‚ figures‚ and illustrations‚ enhancing clarity and efficiency.

Furthermore‚ the SI system provides diagnostic trouble code definitions and diagnostic flowcharts‚ aiding technicians in pinpointing issues quickly. It supports various GM divisions‚ ensuring compatibility across Chevrolet‚ GMC‚ Buick‚ and Cadillac vehicles. Familiarizing oneself with this guide increases effectiveness.

Navigating the SI System

Effectively using the GM Service Information (SI) system requires understanding its structure. Users can search by vehicle year‚ make‚ model‚ and specific component. The system utilizes a logical organization‚ grouping information by systems like engine‚ transmission‚ or brakes. Hyperlinked content allows quick access to related diagrams and procedures.

Familiarity with the SI software’s interface is key; utilizing search filters and keywords will expedite locating relevant repair information. Regularly updated content ensures technicians have the most current diagnostic and repair procedures available for all GM vehicles.

Troubleshooting with GM Service Manuals

GM service manuals provide diagnostic flowcharts and detailed trouble code definitions‚ enabling technicians to pinpoint issues and implement effective repair strategies.

Diagnostic Flowcharts

GM service manuals extensively utilize diagnostic flowcharts as a cornerstone of their troubleshooting guidance. These charts present a logical‚ step-by-step process for identifying the root cause of vehicle malfunctions. Technicians follow a series of questions and tests‚ branching through the flowchart based on the results obtained.

This methodical approach minimizes guesswork and ensures a systematic investigation. Flowcharts often incorporate visual aids and clear instructions‚ making complex diagnostic procedures more accessible. They are crucial for efficiently resolving issues‚ saving time and resources during repairs‚ and ensuring accurate diagnoses.

Trouble Code Definitions

GM service manuals provide comprehensive definitions for all Diagnostic Trouble Codes (DTCs) encountered in General Motors vehicles. These definitions explain the meaning of each code‚ pinpointing the specific system or component experiencing a fault. Understanding DTCs is fundamental for effective diagnosis and repair.

Manuals often include detailed explanations of the conditions that trigger each code‚ along with potential causes and recommended repair actions. This information empowers technicians to accurately interpret vehicle data and efficiently resolve underlying issues‚ ensuring proper vehicle functionality and safety.

Legal Considerations and Copyright

GM service manuals are copyrighted materials; unauthorized reproduction or distribution is prohibited. Proper licensing and authorized use are essential for legal compliance.

Copyright Restrictions

GM service manuals are protected under copyright law‚ preventing unauthorized copying‚ modification‚ or resale. Distributing copies‚ whether physical or digital‚ without explicit permission from General Motors is a violation of these rights.

This protection extends to all content within the manuals‚ including text‚ illustrations‚ wiring diagrams‚ and diagnostic procedures. Users are granted limited rights to utilize the manuals for personal or professional repair work on vehicles they own or are authorized to service‚ but not for commercial reproduction.

Infringement can lead to legal penalties.

Authorized Use of Manuals

GM service manuals are intended for use by qualified technicians and individuals performing vehicle maintenance or repairs on personally owned vehicles. Licensed repair shops and dealerships have authorized access through subscription services like GM Service Information (SI).

Proper use involves adhering to safety precautions and utilizing the information responsibly.

Commercial entities require appropriate licensing to legally utilize these manuals for repair services offered to customers‚ ensuring compliance with copyright regulations and GM’s terms of service.

essick air humidifier manual

Essick Air Humidifier Manual: A Comprehensive Guide

Essick Air humidifiers enhance indoor air, offering solutions from whole-house consoles to personal models․ This guide details setup, maintenance, and troubleshooting for optimal performance․

Understanding Essick Air Humidifiers

Essick Air, renowned for brands like AIRCARE, Champion, and MasterCool, specializes in creating comfortable indoor environments; Their humidifiers address dry air concerns, improving health and well-being․ These devices add vital moisture, alleviating issues like dry skin and irritated sinuses․ Understanding the core principles of operation – evaporative or ultrasonic technology – is key to maximizing benefits․ Proper maintenance, utilizing genuine Essick Air replacement parts, ensures longevity and consistent performance․ This guide will navigate you through each aspect of owning and operating your humidifier effectively․

What is an Essick Air Humidifier?

An Essick Air humidifier is a device designed to increase humidity levels in the air, combating dryness that can cause discomfort․ These humidifiers, marketed under brands like AIRCARE and Champion, utilize various technologies to release moisture․ They range from whole-house console models for extensive coverage to smaller, personal units․ Essick Air focuses on improving indoor air quality, offering solutions for healthier living․ Properly functioning humidifiers can alleviate dry skin, soothe sinuses, and protect wooden furniture from cracking, enhancing overall comfort․

Types of Essick Air Humidifiers

Essick Air offers primarily two humidifier types: evaporative and ultrasonic․ Evaporative Humidifiers use a wick filter to absorb water, then a fan blows air through it, naturally humidifying the air – self-regulating to prevent over-humidification․ Ultrasonic Humidifiers employ high-frequency vibrations to create a cool mist․ These are often quieter but require more diligent cleaning to prevent mineral buildup․ Choosing depends on room size, desired features, and personal preference for mist type and noise level․

Evaporative Humidifiers

Essick Air’s evaporative humidifiers, like the AIRCARE Executive series, utilize a wicking filter to draw water up from the tank․ A fan then blows air through this moistened filter, releasing cool, invisible moisture into the room․ This self-regulating process prevents over-saturation, maintaining comfortable humidity levels․ These models are known for their efficiency and ability to cover larger areas, offering nine fan speeds for customized comfort․ Regular filter replacement is crucial for optimal performance and air quality․

Ultrasonic Humidifiers

Essick Air also offers ultrasonic humidifiers, which employ high-frequency vibrations to create a fine, cool mist․ These models operate quietly and are ideal for smaller spaces or personal use․ Unlike evaporative humidifiers, they don’t use a wick filter, simplifying maintenance․ However, ultrasonic humidifiers can potentially release mineral dust if tap water is used, necessitating distilled water for optimal air quality and to prevent white dust buildup․ They provide a warm or cool mist option for personalized comfort․

Key Features of Essick Air Models

Essick Air humidifiers boast several key features designed for efficient and comfortable operation․ Many models include adjustable fan speeds and mist output controls, allowing users to customize humidity levels․ Features like digital displays, automatic humidity control, and timers enhance convenience․ The use of technologies like Super Wick filters in evaporative models maximizes moisture absorption․ Essick Air prioritizes user-friendly designs and durable construction across its range, ensuring reliable performance and improved indoor air quality․

Whole-House Console Humidifiers

Essick Air’s whole-house console humidifiers are designed for large spaces, offering substantial moisture output․ The AIRCARE Executive model exemplifies this, featuring nine fan speeds and adjustable humidistat control․ These units typically utilize evaporative technology with Super Wick filters for efficient humidification․ Large water tanks minimize refills, and their console design blends seamlessly into home environments․ They provide a smart solution for maintaining optimal humidity levels throughout the entire house, promoting comfort and healthier air․

Desktop/Personal Humidifiers

Essick Air also offers compact desktop and personal humidifiers, ideal for smaller rooms or individual use․ These models often employ ultrasonic technology, creating a cool mist for targeted relief․ Their portable design allows for easy placement on desks, nightstands, or in offices․ While smaller in capacity than console units, they efficiently increase localized humidity․ These humidifiers are a convenient solution for personal comfort, helping to alleviate dryness and improve air quality in focused areas․

Setting Up Your Essick Air Humidifier

Proper setup ensures optimal performance and longevity of your Essick Air humidifier․ Begin by selecting a level surface, away from direct sunlight and heat sources․ Ensure adequate space around the unit for airflow․ Carefully unpack all components and inspect for any damage․ Before first use, familiarize yourself with the humidifier’s parts, referencing the detailed diagrams in this manual․ Correct placement and initial inspection are crucial steps for a trouble-free humidifying experience․

Initial Setup and Placement

Choose a level floor surface, avoiding carpets or uneven areas for stable operation․ Maintain at least three feet of clear space around the humidifier to allow for proper airflow and prevent obstructions․ Avoid placing the unit near furniture or walls susceptible to water damage․ Ensure the location is accessible for easy filling and maintenance․ Proper placement maximizes efficiency and minimizes potential issues, contributing to a healthier and more comfortable indoor environment with your Essick Air humidifier․

Filling the Water Tank

Before filling, ensure the humidifier is powered off․ Remove the water tank and locate the designated fill opening․ Using cool, clean water – distilled or demineralized is recommended – carefully pour water into the tank until full, avoiding the maximum fill line․ Replace the tank securely, ensuring a proper seal․ Avoid adding any additives or chemicals to the water, as these can damage the unit and void the warranty․ Regularly cleaning the tank prevents mineral buildup and maintains optimal performance of your Essick Air humidifier․

Operating Your Essick Air Humidifier

After setup, plug the humidifier into a grounded electrical outlet; Press the power button to initiate operation․ Many models feature adjustable fan speeds or mist output levels; utilize these controls to customize humidity levels to your preference․ The Essick Air humidifier’s control panel allows for precise adjustments․ Monitor the humidity level using a hygrometer for optimal comfort․ Regularly check the water level and refill as needed to maintain consistent performance and enjoy cleaner, more comfortable indoor air․

Powering On and Off

To power on your Essick Air humidifier, ensure the water tank is filled and the unit is plugged into a grounded outlet․ Locate the power button – typically marked with a universal power symbol – and press it firmly․ A light indicator will confirm activation․ To power off, simply press the power button again․ Some models may have a standby mode․ Always unplug the humidifier during extended periods of non-use or when performing maintenance for safety and to conserve energy․

Adjusting Fan Speed/Mist Output

Essick Air humidifiers offer adjustable fan speeds and mist output to customize comfort levels․ Most models feature control buttons or a dial to select from low, medium, and high fan settings․ Higher speeds increase moisture dispersal․ Some units, like the AIRCARE Executive, boast nine fan speeds! Mist output is often linked to fan speed, but dedicated mist control options may exist․ Experiment to find the ideal balance for your room size and desired humidity․ Regularly monitor humidity levels with a hygrometer․

Maintenance and Cleaning

Essick Air humidifiers require regular maintenance for optimal performance and hygiene․ Daily tasks include checking water levels and visually inspecting the unit․ Weekly deep cleaning is crucial; unplug the humidifier and empty the tank․ Clean the tank and other components with a mild disinfectant solution, rinsing thoroughly․ Address mineral buildup promptly to prevent scaling; Neglecting cleaning can lead to mold or bacteria growth, impacting air quality․ Consistent upkeep extends the humidifier’s lifespan and ensures efficient operation․

Daily Maintenance

Essick Air humidifier daily upkeep is simple yet vital․ Begin each day by checking the water tank level, refilling as needed with fresh water – distilled is preferred․ Visually inspect the unit for any signs of mineral buildup or debris; A quick wipe-down of the exterior helps maintain cleanliness․ Ensure the humidifier is placed on a level surface and that the airflow isn’t obstructed․ These small steps contribute significantly to consistent performance and prolong the humidifier’s operational life․

Weekly Deep Cleaning

Essick Air humidifiers benefit from a weekly thorough cleaning․ First, disconnect the unit and empty the water tank․ Use a mild cleaning solution and water to wipe down the tank, base, and any removable parts․ Pay close attention to areas prone to mineral buildup․ Rinse all components thoroughly to remove any cleaning residue․ Allow everything to air dry completely before reassembling and resuming operation․ This prevents mold and bacteria growth, ensuring healthy and efficient humidification․

Filter Replacement

Essick Air humidifier filters require periodic replacement to maintain optimal performance and air quality․ Dirty filters reduce efficiency and can harbor bacteria․ Regularly check your filter’s condition; discoloration indicates it’s time for a change․ Genuine Essick Air replacement filters are readily available for various models like the D46-720 and EP9800․ Consistent filter replacement ensures clean, healthy mist output and prolongs the life of your humidifier, contributing to a comfortable indoor environment․

Identifying Filter Types

Essick Air humidifiers utilize diverse filter types, primarily wick filters and some models employ antimicrobial treated filters․ Wick filters, like the “Super Wick” variety, absorb water and facilitate evaporation․ Identifying your specific filter is crucial for correct replacement․ Check your humidifier’s model number – D46-720, EP9800, or H12400 – to determine the compatible filter․ Refer to the owner’s manual or the Essick Air website for detailed filter specifications and diagrams ensuring optimal performance and air quality․

Replacing the Filter – Step-by-Step

To replace your Essick Air humidifier filter, first, power off and unplug the unit․ Remove the water tank and any remaining water․ Access the filter compartment, typically located on the unit’s base or side․ Remove the old filter, noting its orientation․ Insert the new filter, ensuring it fits snugly and is correctly positioned․ Reassemble the humidifier, refill the tank, plug it in, and power it on․ Regularly replacing filters – especially for models like D46-720 – maintains optimal performance and air quality․

Troubleshooting Common Issues

If your Essick Air humidifier isn’t turning on, check the power cord and outlet․ For low mist output, ensure the filter is clean and properly installed․ Mineral buildup can also restrict mist; consider using distilled water or descaling․ Review the unit’s error codes – decoding these messages provides specific diagnostic information; Regularly cleaning and maintaining your humidifier, including models like the EP9800 and H12400, prevents many issues and ensures efficient operation for cleaner, healthier air․

Humidifier Not Turning On

If your Essick Air humidifier fails to power on, begin by verifying the power cord is securely plugged into a functioning electrical outlet․ Test the outlet with another device to confirm it’s providing power․ Inspect the power cord itself for any visible damage or fraying․ Some models, like the D46-720, may have a reset button; consult your specific model’s documentation․ If the issue persists, contact Essick Air customer support for further assistance, ensuring electrical safety throughout the troubleshooting process․

Low Mist Output

Reduced mist output in your Essick Air humidifier often indicates a dirty wick filter or mineral buildup․ Check and replace the filter – models like the EP9800 require regular filter changes․ Ensure the water tank is filled to the appropriate level․ Mineral deposits can restrict airflow; descaling the unit with a recommended solution is crucial․ Verify the fan is operating at the desired speed․ If problems continue, consult the manual or Essick Air support for specific troubleshooting steps related to your humidifier․

Addressing Mineral Buildup

Mineral buildup is common in humidifiers, impacting performance and longevity․ Using distilled water significantly reduces scale formation, protecting internal components․ For existing buildup, descaling procedures are essential․ Essick Air recommends specific descaling solutions; avoid harsh chemicals․ Follow the manual’s instructions carefully, typically involving running the humidifier with the solution, then rinsing thoroughly․ Regular cleaning prevents significant accumulation, ensuring efficient operation and maintaining optimal air quality․ Ignoring buildup can lead to reduced mist output and potential damage․

Using Distilled Water

Essick Air strongly recommends using distilled water in your humidifier to minimize mineral buildup․ Tap water contains minerals that deposit inside the unit, reducing efficiency and potentially causing damage․ Distilled water is purified, removing these minerals and extending the humidifier’s lifespan․ While tap water can be used, more frequent cleaning and descaling will be required․ Switching to distilled water is a proactive step towards maintaining optimal performance and ensuring cleaner, healthier air․ It’s a simple change with significant benefits․

Descaling Procedures

If mineral buildup occurs despite using distilled water, or if tap water was used, descaling is necessary․ First, unplug the humidifier․ Drain all water and prepare a descaling solution – a mixture of white vinegar and water (follow your model’s specific ratio in the full manual)․ Fill the tank with the solution, let it sit for several hours, then run the humidifier on a low setting․ Afterwards, thoroughly rinse the tank multiple times with clean water before resuming normal operation․ Regular descaling maintains peak performance․

Understanding Error Codes

Essick Air humidifiers utilize error codes to signal malfunctions, aiding in quick troubleshooting․ Consult your specific model’s manual for a complete list, as codes vary․ Common errors might indicate low water levels, filter issues, or motor problems․ Decoding these messages allows for targeted solutions, preventing unnecessary service calls․ Ignoring error codes can lead to further damage․ Always refer to the manual before attempting repairs, and contact customer support if the issue persists after addressing the indicated problem․

Decoding Common Error Messages

A frequent Essick Air error message signals a “Low Water” condition – immediately refill the tank to resolve it․ “Check Filter” indicates a dirty or missing filter, impacting performance and air quality; replace it promptly․ “Motor Error” suggests a potential motor failure, requiring professional assessment․ Other codes may relate to sensor malfunctions or internal component issues․ Always consult your model’s manual for precise definitions․ Ignoring these alerts can cause lasting damage, so address them swiftly for continued optimal humidifier function․

Essick Air Model Numbers and Identification

Locating your Essick Air humidifier’s model number is crucial for accessing specific support and replacement parts․ Typically, it’s found on a sticker located on the unit’s base or rear panel․ Common models include D46-720, EP9800, and H12400․ Knowing your model ensures compatibility when ordering filters or other components․ Essick Air markets humidifiers under various brands – AIRCARE, Champion, and MasterCool – but the model number uniquely identifies the specific unit․ Refer to the owner’s manual or the manufacturer’s website for assistance․

Identifying Your Specific Model

Pinpointing your exact Essick Air humidifier model is essential for accurate troubleshooting and part replacement․ Begin by inspecting the unit’s base or rear panel for a sticker containing the model number․ Common prefixes include “D,” “EP,” and “H,” followed by a series of digits․ If the sticker is missing or illegible, consult your purchase records or the original packaging․ Online resources, like the Essick Air website, often feature model identification tools․ Accurate identification guarantees you obtain the correct filters and components for optimal performance․

Genuine Essick Air Replacement Parts

Maintaining your Essick Air humidifier requires periodic replacement of parts like filters, tanks, and motors․ Utilizing genuine Essick Air parts ensures compatibility and preserves the unit’s performance and warranty․ Numerous online retailers and authorized dealers specialize in Essick Air components․ Popular models, such as the D46-720, EP9800, and H12400, have readily available replacements․ Always verify the part number before purchasing to guarantee a proper fit․ Investing in authentic parts extends the lifespan of your humidifier and maintains optimal air quality․

Where to Purchase Parts

Genuine Essick Air replacement parts are widely accessible through several channels․ The official Essick Air website often lists authorized retailers and provides direct purchasing options․ Major online marketplaces like eBay and Amazon feature numerous vendors selling authentic parts․ Additionally, dedicated appliance parts retailers, both online and brick-and-mortar, carry a comprehensive selection․ When sourcing parts, prioritize reputable sellers to ensure quality and authenticity․ Comparing prices across different platforms can help secure the best deal for your specific Essick Air model․

Compatible Parts for Popular Models (D46-720, EP9800, H12400)

For the D46-720, readily available filters include the 7D6-100 series, often sold in four-packs․ The EP9800 commonly uses specific wick filters designed for optimal evaporative performance․ H12400 models frequently require compatible filters ensuring efficient moisture distribution․ Replacement tanks and motors are also available for these popular units․ Always verify part compatibility using the model number before purchasing․ Online retailers often list compatible parts directly, simplifying the selection process and ensuring a proper fit for your Essick Air humidifier․

Safety Precautions

Electrical safety is paramount; always unplug the humidifier before cleaning or replacing parts․ Avoid operating with a damaged cord or plug․ Use only clean, potable water to prevent mineral buildup and ensure hygienic operation․ Regularly disinfect the tank to inhibit bacterial growth․ Keep the humidifier away from flammable materials and direct sunlight․ Never attempt to repair the unit yourself; contact qualified service personnel․ Ensure proper ventilation and avoid over-humidifying, as this can promote mold growth․ Prioritize water quality and hygiene for a safe experience․

Electrical Safety

Always disconnect the humidifier from the power outlet before any maintenance, including cleaning or filter replacement․ Inspect the power cord regularly for damage; never operate with a frayed or damaged cord; Avoid using extension cords, and if one is absolutely necessary, ensure it’s appropriately rated for the humidifier’s power consumption․ Do not operate the humidifier in wet or damp environments․ Keep the electrical components dry․ Never insert objects into the unit․ If the unit malfunctions, discontinue use and seek professional repair․

Water Quality and Hygiene

Maintaining water quality is crucial for humidifier performance and health․ Always use clean, fresh water, and consider distilled water to minimize mineral buildup․ Regularly empty and clean the water tank to prevent bacterial growth and mold․ Avoid using additives or chemicals in the water, as they can damage the unit and release harmful substances into the air․ Proper hygiene prevents unpleasant odors and ensures optimal air quality․ Disinfect the tank weekly with a mild bleach solution, rinsing thoroughly afterward․

Warranty Information

Essick Air humidifiers are backed by a limited warranty against manufacturing defects․ The warranty period varies by model, typically ranging from one to five years on parts and a shorter period on labor․ To claim warranty service, retain your proof of purchase and contact Essick Air customer support․ The warranty does not cover damage caused by misuse, improper maintenance, or the use of non-genuine replacement parts․ Review your specific model’s warranty details for complete coverage information․

Understanding Your Warranty Coverage

Your Essick Air humidifier warranty generally covers defects in materials and workmanship under normal use․ It excludes damage from improper water quality, lack of maintenance – like filter replacements – and unauthorized repairs․ The warranty is void if the unit is altered or used for commercial purposes․ Keep your original purchase receipt as proof of date․ Contact Essick Air support to initiate a claim, providing model and serial numbers for efficient processing․ Carefully review the full warranty document for specifics․

Essick Air Trademarks and Brands

Essick Air operates under several well-known trademarks, ensuring product quality and recognition․ Key brands include AIRCARE, renowned for whole-house humidification, and Champion, offering robust cooling solutions․ MasterCool and UltraCool represent innovative designs, while Super Wick denotes advanced wicking technology․ Other registered trademarks are Masterstat, Masterlink, MoistAir, and Trapmax, all signifying Essick Air’s commitment to superior air quality and comfort through diverse product lines․

AIRCARE, Champion, MasterCool, UltraCool

AIRCARE humidifiers prioritize whole-house comfort and cleaner air, featuring advanced evaporative technology․ Champion models deliver reliable cooling, often integrated with humidification․ MasterCool represents innovation in evaporative cooling and humidifying systems, while UltraCool focuses on efficient, modern designs․ These brands, all under the Essick Air umbrella, demonstrate a commitment to diverse customer needs, offering solutions ranging from large-capacity consoles to specialized, portable units for optimal indoor air quality․

Resources and Support

For comprehensive assistance with your Essick Air humidifier, the official Essick Air website provides an extensive FAQ section addressing common concerns․ Detailed manuals and troubleshooting guides are readily available for download․ Should you require direct support, customer service can be contacted through the website or by phone․ These resources ensure users can easily resolve issues, locate replacement parts, and maximize the benefits of their humidifier for improved indoor air quality and comfort․

Essick Air Website and FAQs

The official Essick Air website serves as a central hub for product information and support․ A robust FAQ section addresses frequently asked questions regarding setup, operation, maintenance, and troubleshooting of all AIRCARE, Champion, MasterCool, and UltraCool models․ Users can download detailed owner’s manuals, view exploded parts diagrams, and access warranty information․ The website provides a self-service portal designed to empower customers with the knowledge to maintain optimal humidifier performance and indoor air quality․

Customer Support Contact Information

For personalized assistance beyond the online resources, Essick Air provides dedicated customer support channels․ While specific contact details may vary, generally, customers can reach support via phone during business hours for immediate troubleshooting․ Email support offers a convenient method for submitting detailed inquiries and receiving expert guidance․ The Essick Air website typically lists the most current contact information, ensuring users can easily connect with a representative for any concerns regarding their humidifier or replacement parts․

schwinn bicycle owner’s manual

Schwinn Bicycle Owners Manual: A Comprehensive Guide

Schwinn provides downloadable PDF owners manuals for all bike types, including cruisers, road, and hybrid models, ensuring comprehensive support for every rider․

Access assembly guides, maintenance tips, and safety information directly from the Schwinn website, enhancing your cycling experience and bike longevity․

Schwinn boasts a rich heritage, evolving from a humble Chicago workshop to a globally recognized bicycle brand․ For over a century, Schwinn has been dedicated to crafting quality bikes for riders of all ages and skill levels․

This commitment extends to providing comprehensive support through detailed owners manuals․ Whether you’re a seasoned cyclist or a first-time rider, understanding your Schwinn is paramount․ These manuals, available as PDF downloads, offer invaluable insights into assembly, maintenance, and safe operation․

Schwinn prioritizes rider experience, ensuring every journey is enjoyable and secure․

Understanding Your Schwinn Model

To fully utilize your Schwinn bicycle, identifying its specific type is crucial․ Schwinn offers diverse models – cruisers for relaxed rides, road bikes for speed, and hybrids blending versatility․ Knowing your bike’s category informs maintenance and optimal usage․

Furthermore, decoding the serial number reveals the model year and manufacturing details․ This information is vital when accessing specific owners manuals and warranty information․ Schwinn’s website provides resources to decipher these codes, ensuring you have the correct documentation for your particular bike․

Identifying Your Bicycle Type (Cruiser, Road, Hybrid, etc․)

Schwinn categorizes bicycles into distinct types to suit various riding styles․ Cruiser bikes prioritize comfort with upright positions and wider tires, ideal for leisurely rides․ Road bikes are designed for speed and efficiency on paved surfaces, featuring drop handlebars and lightweight frames․

Hybrid bikes offer a blend of both, providing versatility for commuting and recreational riding․ Recognizing your bike’s type—city, road, or hybrid—guides appropriate maintenance, component choices, and optimal riding techniques, enhancing your overall cycling experience with your Schwinn․

Decoding the Serial Number and Model Year

Your Schwinn’s serial number is crucial for identifying its origin and age․ Located typically underneath the bottom bracket, this unique identifier helps trace the bike’s history and verify warranty eligibility․ While a precise decoding guide isn’t publicly available for all years, the serial number assists Schwinn support in providing accurate information․

Determining the model year often requires contacting Schwinn directly with the serial number․ This information is vital for sourcing correct replacement parts and accessing specific owners’ manuals tailored to your bike’s specifications․

Assembly Instructions

Schwinn provides detailed assembly instructions within each bike’s owner’s manual, often available as a downloadable PDF․ Begin by carefully unboxing and inspecting all components for any shipping damage․ The manual guides you through attaching the handlebars, ensuring proper alignment and secure tightening․

Seat installation and adjustment are also covered, followed by wheel and pedal attachment․ Always refer to the manual for torque specifications and safety precautions during assembly to guarantee a smooth and secure build․

Unboxing and Initial Inspection

Upon receiving your new Schwinn bicycle, carefully unpack all components from the shipping box․ A thorough initial inspection is crucial; check for any visible damage incurred during transit․ Verify that all parts listed in the owner’s manual are present, including wheels, handlebars, pedals, and the seat․

Inspect the frame for scratches or dents․ Ensure all protective packaging is removed before proceeding with assembly․ Document any damage immediately and contact Schwinn support if issues are found․

Attaching Handlebars and Seat

Begin by loosening the stem clamp on the handlebars, then carefully insert them into the steerer tube․ Ensure proper alignment before tightening the clamp to the manufacturer’s specified torque․ For the seat, insert the seatpost into the frame’s seat tube, adjusting to your desired height․

Secure the seatpost clamp, again adhering to torque specifications․ Double-check that both the handlebars and seat are firmly attached and won’t shift during riding, prioritizing safety and comfort․

Installing Pedals and Wheels

To install pedals, identify the left and right pedals (marked ‘L’ and ‘R’) and apply grease to the threads․ Screw them into the crank arms – the right pedal tightens clockwise, the left counterclockwise․ For wheel installation, ensure the wheel is centered and fully seated in the dropouts․

Secure the wheel with quick-release levers or axle nuts, verifying they are tightened adequately․ Always double-check that both pedals and wheels are firmly attached before your first ride, ensuring a safe and enjoyable experience․

Maintenance and Repair

Schwinn bicycle maintenance is crucial for longevity and safety․ Regularly inflate tires to the recommended pressure (typically 60 psi for sports touring models), inspect for wear, and address flats promptly․ Brake adjustments ensure optimal stopping power; check cables and pads frequently․

Keep the chain clean and lubricated for smooth shifting․ Addressing chain slippage requires proper adjustment․ Refer to your owner’s manual for specific instructions and consider professional servicing for complex repairs, guaranteeing a reliable ride․

Tire Inflation and Maintenance

Schwinn bicycles utilize various tire types, demanding specific inflation levels․ Sports Touring tires, for example, require 55-60 psi․ Consistent inflation improves rolling efficiency, handling, and prevents premature wear․ Regularly inspect tires for cuts, bulges, or embedded debris․

Proper maintenance extends tire life and enhances safety․ Use a reliable pump with a pressure gauge․ Under-inflation leads to increased rolling resistance, while over-inflation compromises comfort and grip․ Adhering to recommended pressures is vital․

Brake Adjustment and Inspection

Schwinn bicycles feature diverse brake systems, including V-brakes and disc brakes, each requiring specific attention․ Regularly inspect brake pads for wear, replacing them when nearing the wear limit․ Check brake cables for fraying or damage, ensuring smooth operation․

Adjust brake tension to achieve optimal stopping power without excessive lever pull․ Properly adjusted brakes are crucial for safety․ If experiencing brake issues, consult a qualified mechanic․ Routine inspection and maintenance prevent accidents and prolong brake lifespan․

Chain Lubrication and Cleaning

Schwinn recommends regular chain maintenance for optimal performance and longevity․ A clean, lubricated chain minimizes friction and ensures smooth shifting․ Use a bicycle-specific chain cleaner to remove dirt and grime․ After cleaning, apply a quality chain lubricant sparingly, wiping off any excess․

Consistent lubrication prevents rust and wear․ Inspect the chain for damage or stiff links, replacing it if necessary․ A well-maintained chain contributes to a more efficient and enjoyable riding experience, extending the life of your drivetrain components․

Component Overview

Schwinn bicycles utilize various components for a tailored riding experience․ Derailleur systems manage gear changes, while brake types—like V-brakes or disc brakes—ensure stopping power․ Understanding these systems is crucial for maintenance․

Seat and handlebar adjustments allow for personalized comfort and control․ Familiarize yourself with these adjustments to optimize your riding position․ Proper component knowledge empowers you to perform basic maintenance and identify potential issues, enhancing your overall cycling enjoyment․

Derailleur Systems Explained

Derailleur systems on Schwinn bikes facilitate smooth gear transitions, adapting to varying terrains․ Front derailleurs shift the chain between the front chainrings, while rear derailleurs manage the cassette sprockets․

Understanding cable tension and limit screw adjustments is key for precise shifting․ Regular cleaning and lubrication maintain optimal performance․ Properly adjusted derailleurs ensure efficient pedaling and a comfortable ride, extending the lifespan of your drivetrain components․ Familiarize yourself with these systems for a better cycling experience․

Understanding Brake Types (V-Brakes, Disc Brakes)

Schwinn bicycles utilize various brake systems, primarily V-brakes and disc brakes․ V-brakes, known for their simplicity and affordability, offer reliable stopping power via cable-actuated arms․ Disc brakes, available in mechanical and hydraulic versions, provide superior performance, especially in wet conditions․

Hydraulic disc brakes deliver enhanced modulation and stopping force․ Regular inspection of brake pads, cables, and rotors is crucial for safety․ Proper adjustment ensures optimal braking performance and rider control, contributing to a secure cycling experience․

Seat and Handlebar Adjustments

Schwinn bicycles offer adjustable seat and handlebar positions for a customized fit․ Proper seat height is vital; when seated, your leg should have a slight bend at the bottom of the pedal stroke․ Handlebar adjustments impact reach and comfort․

Loosen the quick-release levers or bolts to make adjustments․ Ensure all clamps are securely tightened after adjustment․ A correctly fitted Schwinn bike minimizes strain and maximizes efficiency, enhancing your riding experience and preventing discomfort during longer rides․

Safety First

Schwinn prioritizes rider safety․ Always perform a pre-ride inspection, checking brakes, tires, and chain functionality․ Adhere to local traffic laws and utilize hand signals for turns and stops․ Visibility is key – wear bright clothing and consider reflective gear, especially in low-light conditions․

Crucially, always wear a properly fitted helmet․ A helmet significantly reduces the risk of head injury in the event of a fall․ Prioritize safe riding practices to ensure an enjoyable and secure cycling experience with your Schwinn bicycle․

Pre-Ride Inspection Checklist

Before each ride, Schwinn recommends a thorough inspection․ Verify tire pressure – Schwinn sports touring tires require 55-60 PSI․ Check brake lever function, ensuring responsive and firm engagement․ Inspect the chain for lubrication and proper tension, addressing any slippage․

Confirm handlebar and seat stability, tightening as needed․ Visually examine the frame for any cracks or damage․ A quick pre-ride check ensures optimal performance and, most importantly, rider safety, maximizing your enjoyment on every Schwinn adventure․

Safe Riding Practices

Prioritize visibility by wearing bright clothing․ Always obey traffic laws and signals, acting as if you’re operating a vehicle․ Use hand signals clearly to indicate turns and stops․ Maintain a safe following distance from other cyclists and pedestrians․

Be aware of road hazards like potholes and gravel․ Ride predictably and defensively, anticipating potential dangers․ Regularly inspect your Schwinn for mechanical issues․ Prioritizing these practices ensures a secure and enjoyable cycling experience for you and others․

Helmet Usage and Importance

Schwinn strongly recommends wearing a properly fitted helmet on every ride, regardless of distance or experience level․ A helmet is your primary defense against serious head injuries in the event of a fall or collision․ Ensure the helmet meets current safety standards․

Adjust the straps for a snug, secure fit․ Replace your helmet after any impact, even if there’s no visible damage․ Prioritize your safety – a helmet can significantly reduce the risk of severe head trauma․

Troubleshooting Common Issues

Schwinn owners may encounter flat tires, easily resolved with a tire repair kit or tube replacement․ Brake problems, like spongy levers, often require adjustment or cable replacement․ Chain slippage indicates a need for lubrication and proper tensioning․

Consult your owner’s manual for detailed instructions․ If issues persist, seek assistance from a qualified bicycle mechanic․ Regular maintenance prevents many problems, ensuring a safe and enjoyable riding experience․ Don’t hesitate to address concerns promptly․

Flat Tire Repair

Schwinn manuals detail flat tire repair, starting with removing the wheel․ Inspect the tire for punctures, using water to locate leaks․ Remove the tire from the rim, carefully extracting the tube․ Patch the tube using a repair kit, ensuring a secure bond․

Alternatively, replace the tube entirely․ Reinstall the tire, ensuring proper seating on the rim․ Inflate to the recommended pressure (found on the tire sidewall)․ Always carry a pump and repair kit during rides․

Brake Problems and Solutions

Schwinn owners manuals address common brake issues․ If brakes feel spongy, check for air in the lines (hydraulic brakes) or cable stretch (cable brakes)․ Adjust cable tension using the barrel adjuster for improved responsiveness․ For V-brakes, ensure pads align with the rim․

Disc brake problems may involve contaminated pads or rotor misalignment․ Clean or replace pads as needed․ Regularly inspect brake cables and levers for wear․ If issues persist, consult a professional mechanic․

Chain Slippage and Adjustment

Schwinn manuals detail chain maintenance․ Chain slippage often indicates a worn chain, cassette, or chainrings․ Inspect for stretched links using a chain wear indicator; A properly adjusted rear derailleur is crucial; ensure the B-tension screw is correctly set․

Clean and lubricate the chain regularly to reduce friction and wear․ Check derailleur alignment and limit screws․ If slippage continues after adjustments, replace the chain and potentially the cassette or chainrings․

Schwinn Warranty Information

Schwinn bicycles are covered by a limited warranty against manufacturing defects․ The duration varies by component; frames typically have the longest coverage period․ Original proof of purchase is required for all warranty claims․

Warranty coverage doesn’t extend to normal wear and tear, improper assembly, or damage from accidents․ Register your Schwinn bike online to streamline the warranty process․ Detailed warranty information is available in your owner’s manual or on the Schwinn website․

Downloading Schwinn Owners Manuals (PDF)

Schwinn offers a comprehensive library of owner’s manuals in PDF format, readily available for download on their official website․ You can easily find the manual specific to your bike model, including cruisers, indoor cycling bikes, and trailers․

Accessing these manuals requires Adobe Reader, a free and widely used PDF viewer; Download the appropriate manual for assembly instructions, maintenance guides, safety precautions, and troubleshooting tips, ensuring a smooth and enjoyable riding experience․

Schwinn Support and Contact Information

For dedicated assistance with your Schwinn bicycle, Pacific Cycle, the parent company, provides comprehensive support resources․ While direct contact details aren’t prominently displayed, their website serves as the primary hub for information and downloadable manuals․

Explore the FAQ section for common queries, or utilize the manual download feature to address assembly or maintenance concerns․ Further assistance can be sought through online cycling forums and communities, offering peer-to-peer support and troubleshooting advice for Schwinn products․

Schwinn Bicycle Accessories

Enhance your Schwinn cycling experience with a range of available accessories designed for comfort, safety, and convenience․ While the owners manuals primarily focus on the bicycle itself, Schwinn offers complementary products to personalize your ride․

Explore options like bike trailers for family adventures, ensuring secure transport for children or cargo․ Consider essential safety gear, including helmets and lights, to maximize visibility and protection․ Further accessories can be found through retailers, complementing your Schwinn bicycle․

Indoor Cycling Bikes (IC7, 10 Series) Manuals

Schwinn provides dedicated assembly and owners manuals specifically for its indoor cycling bikes, including the popular IC7 and 10 Series models․ These PDF documents detail setup procedures, console operation, and maintenance schedules tailored for these fitness machines․

Accessing these manuals ensures proper use and longevity of your indoor bike․ They cover everything from initial assembly to troubleshooting common issues, maximizing your workout experience․ Adobe Reader is required to view and print these essential documents, available on the Schwinn website․

Schwinn Bike Trailer Manuals

Schwinn offers comprehensive manuals for its range of bike trailers, designed to guide users through features, applications, and troubleshooting․ These manuals are essential for safe and effective use, covering everything from hitching to child passenger security․

Explore detailed instructions on assembly, proper loading, and maintenance procedures․ Schwinn bike trailer manuals ensure a smooth and enjoyable ride for both cyclist and passenger․ Downloadable PDF versions are readily available, providing convenient access to vital information for optimal trailer performance․

Specific Model Manuals (ZA, ZS, XA, XS)

Schwinn provides dedicated owners manuals for its popular ZA, ZS, XA, and XS bicycle models․ These resources offer tailored guidance, covering specific component details and unique features of each series․ The manuals also include information regarding the Z Bike Zone console, enhancing user experience․

Access detailed instructions on assembly, adjustment, and maintenance procedures specific to your Schwinn model; Downloadable PDF versions ensure convenient access to vital information, maximizing performance and longevity of your bicycle․

Resources for Vintage Schwinn Bicycles

Schwinn’s rich history means many classic bicycles are still enjoyed today! Finding resources for vintage models can be challenging, but dedicated online communities and forums exist․ Websites like thecabe․com host discussions and potentially service manuals for older Schwinn bikes․

While official Schwinn support for very old models is limited, enthusiasts share knowledge and documentation․ These resources can aid in restoration, repair, and understanding the unique characteristics of your vintage Schwinn bicycle, preserving its legacy․

Understanding Tire Pressure Recommendations

Maintaining correct tire pressure is crucial for safety, performance, and tire longevity․ Schwinn derailleur bicycles utilize three primary tire types, each requiring specific inflation levels․ Schwinn Sports Touring tires, sized 26 x 1․55, optimally perform when inflated to 60 PSI․

Always check the sidewall of your tire for the recommended pressure range․ Under-inflation increases rolling resistance and risks pinch flats, while over-inflation reduces grip and comfort․ Regular checks ensure an optimal riding experience․

arizona accounting manual

Arizona Accounting Manual: A Comprehensive Guide

The State of Arizona Accounting Manual (SAAM) serves as the primary policy document for financial operations‚
established by the General Accounting Office‚ ensuring consistent accounting practices across Arizona entities.

The Arizona Accounting Manual (SAAM) is a foundational resource for all state agencies‚ political subdivisions‚ and other entities receiving or expending state funds. It provides a centralized compilation of accounting and financial reporting principles specific to Arizona. Originally developed by the General Accounting Office‚ now part of the Arizona Department of Administration‚ the SAAM aims to standardize financial processes and ensure accountability in the use of public resources.

This comprehensive guide details policies and procedures covering the entire financial lifecycle‚ from initial transaction authorization to final reporting. The SAAM isn’t merely a set of rules; it’s a dynamic document evolving alongside changes in governmental accounting standards and Arizona legislation‚ offering clarity and consistency for financial management within the state.

Purpose and Scope of the SAAM

The primary purpose of the Arizona Accounting Manual (SAAM) is to establish uniform accounting and financial reporting standards throughout Arizona’s governmental entities. Its scope encompasses all aspects of financial administration‚ including budgeting‚ procurement‚ revenue collection‚ expenditure control‚ and asset management. The SAAM ensures compliance with both Generally Accepted Accounting Principles (GAAP) and Governmental Accounting Standards Board (GASB) pronouncements‚ tailored to the unique context of Arizona state government.

It applies to all state agencies‚ universities‚ community colleges‚ and local governments receiving state funding. The manual provides detailed guidance on proper accounting procedures‚ internal controls‚ and reporting requirements‚ promoting transparency and accountability in the stewardship of public funds. Ultimately‚ the SAAM facilitates sound financial decision-making and responsible governance.

History and Evolution of Arizona’s Accounting Policies

Arizona’s accounting policies have evolved significantly since the establishment of the State Accounting Office. Initially‚ practices were largely based on traditional governmental accounting methods‚ with limited standardization across agencies. Over time‚ the adoption of Generally Accepted Accounting Principles (GAAP) and‚ crucially‚ the standards set by the Governmental Accounting Standards Board (GASB)‚ drove substantial changes.

The development and adoption of the Minimum Accounting Standards (MAS) – codified in Arizona Code – marked a pivotal moment‚ aiming to ensure financial safety and accountability. The SAAM itself emerged as the central policy publication‚ continually updated to reflect evolving standards and best practices. This ongoing evolution reflects a commitment to transparency‚ fiscal responsibility‚ and improved financial reporting within the state.

Key Accounting Standards in Arizona

Arizona’s financial reporting adheres to GAAP and GASB standards‚ alongside specific state regulations‚ ensuring uniformity and transparency in governmental and private sector accounting.

Generally Accepted Accounting Principles (GAAP)

Generally Accepted Accounting Principles (GAAP) form the foundational framework for financial accounting in Arizona‚ providing a common set of rules and standards for consistent reporting. These principles‚ established by bodies like the Financial Accounting Standards Board (FASB)‚ dictate how transactions are recognized‚ measured‚ and presented in financial statements.

Adherence to GAAP ensures comparability and reliability of financial information‚ crucial for investors‚ creditors‚ and other stakeholders. Key aspects include accrual accounting‚ the matching principle‚ and full disclosure. While Arizona also incorporates Governmental Accounting Standards Board (GASB) standards for governmental entities‚ GAAP remains central for most businesses operating within the state. Proper application of GAAP is vital for accurate financial reporting and informed decision-making‚ fostering trust and transparency in Arizona’s economic landscape.

Governmental Accounting Standards Board (GASB) Standards

Governmental Accounting Standards Board (GASB) standards are specifically designed for state and local governments‚ including Arizona’s state agencies and municipalities. As an independent‚ private-sector organization‚ GASB establishes accounting and financial reporting standards for these public entities‚ differing from the rules governing for-profit businesses under GAAP.

GASB standards emphasize accountability and transparency in the use of public funds. Key areas include fund accounting‚ budgetary integration‚ and reporting of infrastructure assets. The Arizona Office of the Auditor General utilizes GASB guidelines when auditing state agencies‚ ensuring compliance with these specialized standards. Adhering to GASB is crucial for demonstrating responsible financial stewardship and maintaining public trust in governmental operations within Arizona‚ promoting sound fiscal management.

Arizona-Specific Accounting Regulations

Arizona supplements nationally recognized accounting principles with regulations tailored to its unique governmental structure and economic landscape. These regulations often build upon GASB standards‚ providing further clarification or addressing specific state requirements. The State of Arizona Accounting Manual (SAAM) itself embodies these Arizona-specific guidelines‚ serving as the central resource for state agencies.

Key areas include detailed procedures for managing the Arizona Transaction Privilege Tax (TPT)‚ specific reporting formats for state funds‚ and rules governing the accounting for state-owned assets. Furthermore‚ the Arizona Office of the Auditor General provides guidance on interpreting and applying these regulations. Compliance with these Arizona-specific rules is essential for ensuring accurate financial reporting and maintaining accountability to taxpayers within the state.

Setting Up an Accounting System in Arizona

Establishing a robust accounting system in Arizona requires careful software selection‚ a well-defined chart of accounts‚ and strong internal controls‚ guided by SAAM principles.

Choosing Accounting Software for Arizona Businesses

Selecting the right accounting software is crucial for Arizona businesses‚ demanding a solution aligned with the State of Arizona Accounting Manual (SAAM) guidelines and specific operational needs. Considerations include compatibility with Arizona’s Transaction Privilege Tax (TPT) reporting‚ payroll tax requirements‚ and integration capabilities with existing systems.

Browser-based‚ intuitive software options are available‚ streamlining financial management for startups and established enterprises alike. Businesses should prioritize software offering robust reporting features to meet compliance standards set by the Arizona Office of the Auditor General and the Governmental Accounting Standards Board (GASB).

Features like automated bank reconciliation‚ invoice generation‚ and expense tracking are essential. Thorough evaluation‚ including demos and trials‚ ensures the chosen software effectively supports accurate financial record-keeping and reporting‚ adhering to the principles outlined within the SAAM.

Chart of Accounts for Arizona Entities

A well-defined chart of accounts is fundamental for Arizona entities‚ aligning with the State of Arizona Accounting Manual (SAAM) to ensure consistent and accurate financial reporting. This structure categorizes all financial transactions‚ facilitating the preparation of compliant financial statements.

The chart should include accounts specific to Arizona’s unique tax landscape‚ such as Transaction Privilege Tax (TPT) payable and receivable accounts. Categorization must adhere to Generally Accepted Accounting Principles (GAAP) and Governmental Accounting Standards Board (GASB) standards‚ as applicable.

Detailed account descriptions are vital for clarity and auditability. Regular review and updates are necessary to reflect changes in business operations and evolving accounting regulations outlined in the SAAM‚ ensuring accurate financial data for informed decision-making and regulatory compliance.

Establishing Internal Controls

Robust internal controls are paramount for Arizona entities‚ as emphasized within the State of Arizona Accounting Manual (SAAM)‚ safeguarding assets and ensuring reliable financial reporting. These controls encompass policies and procedures designed to prevent and detect errors or fraud‚ promoting accountability and transparency.

Key components include segregation of duties‚ authorization protocols‚ and regular reconciliations. Arizona’s Minimum Accounting Standards (MAS) further reinforce the need for controls‚ particularly for judicial administration funds.

Effective internal controls require ongoing monitoring and evaluation‚ adapting to changing risks and operational environments. Documentation of these controls is crucial for auditability and demonstrating compliance with the SAAM and relevant regulations‚ ultimately bolstering financial integrity.

Financial Statement Preparation

Arizona’s SAAM guides entities in preparing compliant financial statements‚ adhering to GASB standards and specific state requirements for accurate reporting and transparency.

Balance Sheet Requirements in Arizona

Arizona’s SAAM dictates specific balance sheet presentations‚ aligning with Governmental Accounting Standards Board (GASB) principles. Entities must clearly categorize assets‚ liabilities‚ and equity‚ differentiating between current and non-current classifications. Detailed disclosures regarding significant asset valuations‚ debt obligations‚ and equity components are crucial for transparency.

The balance sheet should accurately reflect the financial position at a specific point in time‚ adhering to the accrual basis of accounting. Proper classification of fund balances – restricted‚ committed‚ assigned‚ and unassigned – is essential for governmental entities. Furthermore‚ the SAAM emphasizes the importance of disclosing contingent liabilities and commitments‚ providing a comprehensive view of the organization’s financial health. Compliance with these requirements ensures accountability and informed decision-making by stakeholders.

Income Statement Guidelines

Arizona’s SAAM outlines specific guidelines for income statement preparation‚ emphasizing adherence to GASB standards. The statement should clearly present revenues‚ expenses‚ and changes in net position over a defined period. Governmental entities must categorize revenues by source – program revenues and general revenues – to demonstrate funding origins. Expenses are typically classified by function‚ such as public safety or education‚ enabling performance assessment.

The SAAM stresses the importance of disclosing significant accounting policies and any unusual or infrequent items impacting financial results. Modifications to the traditional income statement format may be required for specific fund types. Accurate presentation of budgetary comparisons is also often mandated. Following these guidelines ensures transparency and allows stakeholders to evaluate the financial performance of Arizona entities effectively.

Statement of Cash Flows – Arizona Specifics

Arizona’s SAAM mandates the statement of cash flows be prepared using the direct or indirect method‚ aligning with GASB requirements. It categorizes cash flows into operating‚ investing‚ and financing activities‚ providing a clear picture of cash inflows and outflows. Specific to Arizona governmental entities‚ the SAAM emphasizes proper classification of interagency transfers and quasi-internal transactions.

Detailed disclosure of noncash investing‚ financing‚ and operating activities is crucial. The statement must reconcile the beginning and ending cash balances‚ ensuring accuracy and transparency. Arizona agencies often deal with significant grant funding; therefore‚ proper accounting for these inflows is highlighted. Adherence to these guidelines facilitates understanding of an entity’s ability to generate cash and meet its obligations.

Specific Accounting Procedures

Arizona’s SAAM details procedures for accounts payable‚ receivable‚ and payroll‚ emphasizing timely processing‚ accurate documentation‚ and robust internal controls for financial integrity.

Accounts Payable Processing

Arizona’s SAAM outlines a structured accounts payable process‚ beginning with invoice receipt and verification against purchase orders and receiving reports to ensure accuracy. Proper coding to the correct general ledger accounts is crucial‚ adhering to the established chart of accounts.

All invoices require appropriate approval authorization based on pre-defined spending limits‚ documented within the SAAM guidelines. Payment terms should be carefully observed to maximize potential discounts and maintain positive vendor relationships.

Detailed records of all transactions‚ including invoice copies‚ receiving reports‚ and approval documentation‚ must be maintained for audit purposes. The SAAM emphasizes compliance with prompt payment laws and regulations‚ avoiding penalties and fostering good financial standing. Electronic payment methods are encouraged where feasible‚ streamlining the process and enhancing security.

Accounts Receivable Management

The Arizona Accounting Manual (SAAM) stresses diligent accounts receivable management for maintaining healthy cash flow. Prompt and accurate invoicing is paramount‚ including clear details of goods or services provided‚ payment terms‚ and accepted payment methods. Regular monitoring of outstanding invoices is essential‚ identifying overdue amounts for timely follow-up.

The SAAM recommends establishing a consistent collection process‚ starting with courteous reminder notices and escalating to more formal demand letters if necessary. Maintaining detailed records of all collection efforts‚ including dates‚ methods‚ and outcomes‚ is crucial for audit trails.

Consideration should be given to offering early payment discounts to incentivize prompt settlement. Regularly reconciling accounts receivable subledger to the general ledger ensures accuracy and identifies any discrepancies requiring investigation. Write-off policies for uncollectible accounts must adhere to SAAM guidelines.

Payroll Accounting in Arizona

The Arizona Accounting Manual (SAAM) outlines strict guidelines for payroll processing‚ emphasizing compliance with both federal and state regulations. Accurate and timely calculation of gross pay‚ deductions (including Arizona state income tax‚ and Federal taxes)‚ and net pay is critical. Employers must adhere to Arizona’s wage and hour laws‚ including minimum wage requirements and overtime provisions.

SAAM mandates meticulous record-keeping of all payroll data‚ including employee earnings‚ deductions‚ and tax withholdings. Regular reconciliation of payroll accounts is essential to ensure accuracy and identify any discrepancies. Proper classification of employees (exempt vs. non-exempt) is vital for overtime compliance.

Timely and accurate filing of payroll tax returns with the Arizona Department of Revenue and the IRS is non-negotiable. The SAAM provides resources and guidance on navigating these complex requirements‚ including W-2 and 1099 reporting.

Tax Compliance in Arizona

The Arizona Accounting Manual (SAAM) stresses adherence to Arizona’s Transaction Privilege Tax (TPT)‚ income tax reporting‚ and federal tax laws for businesses.

Arizona Transaction Privilege Tax (TPT)

The Arizona Accounting Manual (SAAM) provides detailed guidance on navigating the complexities of the Arizona Transaction Privilege Tax (TPT). This tax‚ a significant revenue source for the state and local jurisdictions‚ is levied on gross receipts from retail sales‚ services‚ and certain other transactions.

SAAM outlines proper classification of taxable transactions‚ exemption criteria‚ and reporting requirements for TPT. Businesses must accurately determine their TPT rate based on their business location and the nature of their activities. The manual emphasizes the importance of maintaining detailed records to support TPT filings and potential audits.

Furthermore‚ SAAM addresses specific TPT considerations for various industries‚ including construction‚ tourism‚ and online sales. It also clarifies procedures for collecting‚ remitting‚ and reporting TPT‚ ensuring compliance with Arizona’s tax laws and minimizing potential penalties.

Arizona Income Tax Reporting

The Arizona Accounting Manual (SAAM) details the procedures for accurate Arizona income tax reporting for both individuals and businesses. It clarifies requirements for withholding‚ estimated tax payments‚ and annual filing obligations. SAAM emphasizes the importance of correctly classifying income sources and applying applicable deductions and credits to determine taxable income.

The manual provides guidance on completing Arizona tax forms‚ including Form A-1 for individuals and Form 110 for corporations. It addresses specific tax implications related to various business structures‚ such as sole proprietorships‚ partnerships‚ and limited liability companies.

SAAM also outlines the rules for reporting income from out-of-state sources and claiming Arizona tax credits‚ ensuring compliance with state tax laws. Proper record-keeping and adherence to SAAM guidelines are crucial for avoiding penalties and maintaining accurate financial reporting.

Federal Tax Considerations for Arizona Businesses

The Arizona Accounting Manual (SAAM) acknowledges the interplay between state and federal tax regulations for businesses operating within Arizona. While SAAM focuses on Arizona-specific requirements‚ it stresses the need for concurrent compliance with Internal Revenue Service (IRS) guidelines. This includes accurate reporting of federal taxable income‚ utilizing appropriate IRS forms‚ and adhering to federal tax deadlines.

SAAM highlights potential differences between federal and Arizona tax laws‚ such as varying depreciation methods or treatment of certain deductions. Businesses must understand these discrepancies to avoid errors and ensure complete tax compliance.

The manual emphasizes the importance of maintaining detailed records to support both state and federal tax filings‚ facilitating audits and minimizing potential liabilities. Proper coordination between Arizona and federal tax reporting is vital for all Arizona businesses.

LLC Formation and Accounting

The Arizona Accounting Manual (SAAM) details specific filing requirements and accounting procedures for Limited Liability Companies (LLCs) established within the state of Arizona.

Arizona LLC Filing Requirements

The Arizona Accounting Manual (SAAM) outlines crucial steps for forming an LLC‚ referencing the Arizona application for limited liability company formation. This document requests essential information‚ including the entity type and the proposed LLC name‚ ensuring compliance with state regulations.

Filing requirements‚ as detailed within SAAM‚ necessitate a registered agent within Arizona‚ responsible for receiving official legal and tax correspondence. The Articles of Organization must be submitted to the Arizona Corporation Commission‚ alongside the appropriate filing fee. SAAM emphasizes the importance of maintaining accurate records of member contributions and ownership percentages.

Furthermore‚ the manual directs filers to adhere to naming conventions‚ avoiding misleading or prohibited terms. Operating Agreements‚ while not filed with the state‚ are strongly recommended by SAAM to define member roles‚ responsibilities‚ and profit/loss allocation‚ establishing a clear internal governance structure for the LLC.

Accounting for LLCs in Arizona

The Arizona Accounting Manual (SAAM) dictates that LLC accounting depends on member election – treated as sole proprietorships (single-member LLCs) or partnerships (multi-member LLCs) for federal tax purposes‚ impacting financial reporting. SAAM stresses the importance of maintaining separate bank accounts for the LLC‚ distinct from personal funds‚ to ensure clear financial tracking.

SAAM emphasizes utilizing a comprehensive chart of accounts tailored to the LLC’s specific operations. Accurate record-keeping of member contributions‚ distributions‚ and capital accounts is paramount. The manual guides on properly classifying revenues and expenses‚ adhering to Generally Accepted Accounting Principles (GAAP) where applicable.

Furthermore‚ SAAM highlights the need for consistent application of accounting methods. While not requiring full accrual accounting for all LLCs‚ SAAM recommends it for larger entities to provide a more accurate financial picture‚ facilitating informed decision-making and compliance with potential audit requirements.

Tax Implications for Arizona LLCs

The Arizona Accounting Manual (SAAM) directs LLCs to understand their tax obligations‚ primarily through-the-entity taxation‚ where profits and losses pass through to members’ personal income taxes. SAAM emphasizes accurate tracking of member distributive shares for proper Arizona income tax reporting.

Arizona’s Transaction Privilege Tax (TPT) applies to LLCs based on their business activity; SAAM provides guidance on classifying business activities to determine the correct TPT rate and filing requirements. The manual stresses the importance of timely and accurate TPT filings to avoid penalties.

SAAM also addresses federal tax considerations‚ noting that LLCs can elect to be taxed as corporations (S-corp or C-corp)‚ impacting their tax liabilities; Proper accounting for self-employment taxes and potential deductions is crucial. Maintaining detailed records‚ as outlined in SAAM‚ is vital for supporting tax filings and potential audits.

Auditing and Reporting Guidelines

The Arizona Accounting Manual (SAAM) incorporates guidelines from the Governmental Accounting Standards Boards and the Office of Management and Budget‚ ensuring compliance.

Arizona Office of the Auditor General Guidelines

The Arizona Office of the Auditor General (OAG) plays a crucial role in ensuring fiscal responsibility and transparency within state government. Their guidelines‚ deeply rooted in the State of Arizona Accounting Manual (SAAM)‚ provide a framework for consistent and reliable financial reporting. These guidelines meticulously follow standards established by the Governmental Accounting Standards Boards (GASB) and the Office of Management and Budget (OMB)‚ promoting uniformity across all state agencies.

The OAG’s oversight extends to reviewing financial statements‚ internal controls‚ and compliance with applicable laws and regulations. They issue audit reports detailing findings and recommendations for improvement‚ ultimately safeguarding public funds. Adherence to these guidelines is paramount for state entities‚ fostering public trust and accountability. The OAG’s work directly supports the principles outlined within the SAAM‚ reinforcing its importance as the foundational document for Arizona’s public sector accounting practices.

Compliance with Minimum Accounting Standards (MAS)

Minimum Accounting Standards (MAS)‚ codified within the Arizona Code for Judicial Administration Section 1-401‚ represent a foundational element of financial accountability for specific entities within the state. These standards‚ developed to ensure the safety and proper handling of funds‚ are intrinsically linked to the broader guidance provided by the State of Arizona Accounting Manual (SAAM). MAS focuses on core accounting functions‚ establishing a baseline for financial record-keeping and reporting.

Compliance with MAS is particularly critical for judicial branch entities and other designated organizations. It mandates specific procedures for budgeting‚ revenue collection‚ expenditure control‚ and financial reporting. While MAS provides a minimum standard‚ entities are encouraged to exceed these requirements by adopting more comprehensive practices detailed within the SAAM. Regular monitoring and adherence to MAS are essential for maintaining fiscal integrity and demonstrating responsible stewardship of public resources.

Reporting Requirements for State Agencies

State agencies in Arizona are subject to stringent reporting requirements‚ meticulously outlined within the State of Arizona Accounting Manual (SAAM) and guided by the Governmental Accounting Standards Board (GASB). These requirements encompass annual financial reports‚ including balance sheets‚ income statements‚ and statements of cash flows‚ prepared in accordance with GASB standards. The Office of the Auditor General provides specific reporting guidelines‚ ensuring uniformity and transparency.

Agencies must also submit detailed budgetary reports‚ demonstrating adherence to allocated funds and providing justifications for any variances. Furthermore‚ performance reports‚ linking financial data to programmatic outcomes‚ are increasingly emphasized. Timely and accurate reporting is crucial for legislative oversight and public accountability. The SAAM details the specific formats‚ deadlines‚ and submission procedures for all required reports‚ promoting consistent financial management across the state.

white rodgers 1f86-344 manual

White-Rodgers 1F86-344 Manual: A Comprehensive Guide

This guide details the 1F86-344 non-programmable thermostat, covering installation, operation, troubleshooting, and advanced settings for optimal HVAC system control.

Today’s date is 02/07/2026 16:00:46 (), providing current context for manual usage and referencing available resources.

The White-Rodgers 1F86-344 is a widely utilized, non-programmable, electronic digital thermostat designed for standard single-stage heating and cooling systems. It serves as a direct replacement for the 1F86-244 model, offering reliable temperature control in residential settings. This thermostat features a clear display and simple operation, making it user-friendly for homeowners.

Its compatibility extends to various HVAC systems, utilizing standard wiring configurations with terminals for RC, C, RH, W, Y, G, O, and B connections. The 1F86-344 operates within a temperature range of 45-90°F, ensuring comfortable indoor climates.

This manual provides comprehensive instructions for installation, operation, and troubleshooting, ensuring proper functionality and longevity of the device. Access to the official installation and operation manual, including a French language version, is readily available online through resources like the Internet Archive and ManualsLib.

Key Features and Specifications

The White-Rodgers 1F86-344 boasts several key features, including its non-programmable design for straightforward temperature management. It’s an electronic, digital thermostat offering accurate and consistent heating and cooling control. Its primary specification is its single-stage (1H/1C) operation, suitable for conventional HVAC systems.

The thermostat’s temperature range spans from 45 to 90 degrees Fahrenheit, accommodating diverse climate needs. Standard terminal connections – RC, C, RH, W, Y, G, O, and B – ensure compatibility with existing wiring.

Being a direct replacement for the 1F86-244, it simplifies upgrades. Detailed installation and operation instructions are available in PDF format via ManualsLib and other online resources, facilitating easy setup and use. It’s designed for reliable, long-term performance.

Installation Procedures

Proper installation requires careful adherence to safety precautions, utilizing the correct tools, and accurately following the wiring diagram for the 1F86-344 thermostat.

Safety Precautions Before Installation

Before commencing installation of the White-Rodgers 1F86-344 thermostat, prioritize safety to prevent personal injury and ensure proper functionality. Always disconnect power to the HVAC system at the breaker box or fuse to avoid electrical shock.

Verify the system voltage matches the thermostat’s requirements. Carefully read and understand all instructions contained within this manual before beginning. If you are unfamiliar with electrical wiring, consult a qualified HVAC technician.

Failure to follow these instructions could result in damage to the thermostat, the HVAC system, or cause serious harm. Keep these instructions readily available for future reference. Ensure the installation area is dry and free from obstructions. Proper grounding is essential for safe operation.

Tools Required for Installation

Successfully installing the White-Rodgers 1F86-344 thermostat requires a few essential tools. A small flathead screwdriver is crucial for terminal connections and adjustments. A Phillips head screwdriver will be needed for mounting the thermostat baseplate securely to the wall.

Wire strippers are necessary to expose the correct length of wire for reliable connections. A wire connector or wire nuts are vital for safely joining wires. A level ensures the thermostat is mounted straight for accurate readings.

A voltage tester verifies power is off before working with wiring. Pliers can assist with wire manipulation. Finally, a digital multimeter can be helpful for troubleshooting, though not strictly required for basic installation.

Wiring Diagram and Terminal Identification (RC, C, RH, W, Y, G, O, B)

Understanding the terminal designations is critical for correct wiring. RC provides 24V power for cooling, while RH supplies 24V power for heating. C is the common wire, completing the circuit. W activates the heating system, and Y controls the cooling.

G energizes the blower fan, circulating air. O controls the reversing valve in heat pump systems. B energizes the auxiliary or emergency heat.

Always refer to your HVAC system’s wiring diagram before connecting any wires. Incorrect wiring can damage the thermostat or your HVAC equipment. Double-check all connections before restoring power. A typical setup involves connecting wires to these specific terminals for proper operation.

Step-by-Step Installation Guide

Begin by turning off power to your HVAC system at the breaker. Remove the old thermostat’s cover and carefully disconnect the wires, labeling each one. Attach the 1F86-344’s mounting plate to the wall, ensuring it’s level. Connect the wires to the corresponding terminals (RC, C, RH, W, Y, G, O, B) as per your system’s wiring diagram.

Securely attach the thermostat body to the mounting plate. Restore power at the breaker. Verify the thermostat powers on and the display functions correctly. Follow the operating instructions to set the desired temperature and system mode.

Test both heating and cooling to confirm proper operation. If issues arise, consult the troubleshooting section.

Operating Instructions

The 1F86-344 features simple controls for temperature setting, system mode selection (Heat, Cool, Auto, Off), and fan operation (Auto, On) for user comfort.

Understanding the Display and Buttons

The White-Rodgers 1F86-344 thermostat utilizes a clear, digital display to show the current room temperature and the setpoint temperature. The display also indicates the active system mode – Heat, Cool, Auto, or Off. Understanding the button functions is crucial for operation.

Typically, there are up and down arrow buttons for adjusting the desired temperature. A “Mode” button cycles through the available system modes. The “Fan” button allows selection between “Auto” (fan runs only during heating or cooling) and “On” (fan runs continuously).

Familiarize yourself with these controls to efficiently manage your home’s climate. The thermostat’s simplicity ensures ease of use for all users, providing straightforward temperature management without complex programming.

Setting the Temperature

Adjusting the temperature on your White-Rodgers 1F86-344 thermostat is straightforward. Use the “Up” and “Down” arrow buttons located on the thermostat face. Each press will incrementally increase or decrease the setpoint temperature, displayed prominently on the digital screen.

The thermostat operates within a range of 45-90 degrees Fahrenheit. Observe the display to confirm your desired temperature is selected. Allow several minutes for the system to respond to the new setting.

Remember that the displayed temperature is the setpoint, not necessarily the actual room temperature. The system will activate heating or cooling to reach and maintain this setpoint, ensuring comfortable conditions.

System Mode Selection (Heat, Cool, Auto, Off)

The 1F86-344 thermostat offers four distinct system modes: Heat, Cool, Auto, and Off. To cycle through these modes, utilize the “Mode” button on the control panel. Each press will advance to the next available setting, displayed clearly on the screen.

“Heat” mode activates the heating system when the room temperature falls below the setpoint. “Cool” mode activates cooling when the temperature exceeds the setpoint. “Auto” mode intelligently switches between heating and cooling to maintain the desired temperature.

Selecting “Off” disables both heating and cooling, allowing for manual control or energy conservation. Ensure the correct mode is selected for optimal comfort and efficiency.

Fan Control Settings (Auto, On)

The White-Rodgers 1F86-344 thermostat provides two fan control options: “Auto” and “On”. These settings dictate how the blower fan operates in conjunction with the heating or cooling system. Access these settings via the designated “Fan” button on the thermostat’s interface.

Selecting “Auto” mode means the fan will only run when the heating or cooling system is actively operating. This conserves energy and ensures efficient air circulation only when needed.

Choosing “On” mode forces the fan to run continuously, regardless of whether heating or cooling is engaged. This provides constant air circulation, potentially improving air quality and temperature consistency throughout the space.

Troubleshooting Common Issues

This section addresses frequent problems with the 1F86-344, including power failures, inaccurate readings, and unresponsive heating/cooling, offering diagnostic steps.

Thermostat Not Powering On

If the 1F86-344 thermostat fails to power on, begin by verifying the power supply. Ensure the HVAC system’s breaker hasn’t tripped and is reset. Check the thermostat wiring, specifically the ‘C’ (common) wire connection, as this is crucial for continuous power. A loose or disconnected ‘C’ wire is a common culprit.

Confirm the batteries are fresh, even if the thermostat is hardwired, as some models use batteries as a backup or for initial power. Inspect the wiring terminals for corrosion or damage, cleaning them if necessary. If the issue persists, carefully review the wiring diagram to confirm correct connections – RC, RH, W, Y, G, O, and B.

A faulty transformer within the HVAC system could also prevent power from reaching the thermostat. If you’ve checked all wiring and power sources without success, professional HVAC assistance is recommended.

Inaccurate Temperature Readings

If the 1F86-344 thermostat displays inaccurate temperatures, several factors could be at play. First, ensure the thermostat isn’t directly exposed to sunlight, drafts, or heat-generating appliances, as these can skew readings. Check for obstructions blocking airflow around the thermostat.

The thermostat may require temperature calibration. Refer to the ‘Advanced Settings’ section of this manual for instructions on adjusting the temperature offset. Verify the thermostat is level, as an unlevel installation can affect accuracy. Consider the thermostat’s location; internal walls generally provide more stable readings than exterior walls.

If calibration doesn’t resolve the issue, a faulty temperature sensor within the thermostat may be the cause, requiring professional replacement or HVAC technician assistance.

Heating or Cooling Not Responding

If your HVAC system isn’t responding to the 1F86-344 thermostat’s calls for heating or cooling, begin by verifying the system’s power supply at the breaker box. Ensure the thermostat is set to the correct ‘System Mode’ (Heat, Cool, or Auto) and the set temperature is appropriately adjusted.

Check the wiring connections at the thermostat and the HVAC unit, referencing the ‘Wiring Diagram’ section of this manual. A loose or incorrect wire can prevent proper operation. Confirm the air filter is clean, as a clogged filter restricts airflow and can trigger safety shutdowns.

If issues persist, a problem with the HVAC system itself (e.g., a faulty furnace or compressor) may exist, requiring professional diagnosis and repair.

Display Errors and Codes

The White-Rodgers 1F86-344 thermostat utilizes the display to communicate system status and potential errors. While this model is relatively simple, certain codes may appear indicating a problem. Consult the full installation and operation manual (available online – see ‘Manual Resources and Downloads’) for a comprehensive list of error codes and their meanings.

Common issues might include a flashing display indicating low batteries or a communication error with the HVAC system. If an error code appears, record it carefully before attempting any troubleshooting steps.

Referencing the manual’s error code section will provide specific guidance on resolving the issue, potentially saving a service call.

Advanced Settings and Configuration

Explore temperature calibration and cycle rate adjustments to fine-tune the 1F86-344 thermostat’s performance. Battery replacement instructions are also detailed within this section.

Temperature Calibration

The White-Rodgers 1F86-344 thermostat allows for temperature calibration, enabling users to adjust the displayed temperature to match a trusted external thermometer. This is crucial for ensuring accurate heating and cooling cycles, optimizing comfort, and preventing system inefficiencies.

Calibration is recommended if you suspect a discrepancy between the thermostat’s reading and a known accurate temperature source. The process typically involves accessing a specific setting within the thermostat’s configuration menu. Adjustments are made in small increments, usually one or two degrees Fahrenheit, until the displayed temperature aligns with the reference thermometer.

Carefully follow the instructions in the official manual to avoid unintended temperature offsets. Incorrect calibration can lead to discomfort or increased energy consumption; Remember to document any calibration changes for future reference and potential reversion to the original settings if needed.

Cycle Rate Adjustment

The 1F86-344 thermostat offers cycle rate adjustment, influencing how frequently the heating or cooling system turns on and off. This feature impacts comfort levels and energy efficiency, particularly in systems prone to short-cycling or long run times. Adjusting the cycle rate can minimize temperature swings and reduce wear and tear on HVAC equipment.

Shorter cycle rates mean more frequent on/off cycles, potentially improving temperature consistency but increasing component stress. Longer cycle rates result in fewer cycles, reducing wear but potentially causing temperature fluctuations. The optimal setting depends on the specific HVAC system and homeowner preferences.

Consult the official installation and operation manual for detailed instructions on accessing and modifying the cycle rate. Improper adjustments can negatively affect system performance, so proceed with caution and document any changes made.

Battery Replacement

The White-Rodgers 1F86-344 thermostat requires battery power to maintain settings during power outages and for consistent operation. Low battery levels can cause inaccurate readings or complete thermostat failure. Regular battery replacement ensures reliable performance and prevents unexpected heating or cooling disruptions.

The thermostat typically uses two AA alkaline batteries, easily accessible via a battery compartment. Before replacing, note the current settings to restore them accurately. Always use fresh, high-quality batteries for optimal longevity and performance. Avoid mixing old and new batteries.

Refer to the installation and operation manual for specific battery replacement instructions and warnings. Dispose of used batteries responsibly, following local regulations. A low battery indicator will usually appear on the display when replacement is needed.

Compatibility and Replacement

The 1F86-344 is compatible with standard 1H/1C HVAC systems and directly replaces the 1F86-244 model, offering a simple upgrade path.

Compatible HVAC Systems

The White-Rodgers 1F86-344 thermostat is designed for use with conventional, single-stage heating and cooling systems. Specifically, it supports systems with 24-volt control, commonly found in residential applications; This includes forced air furnaces (gas, oil, or electric), central air conditioners, and heat pumps – though functionality with heat pumps may be limited to basic heating and cooling operations.

It’s crucial to verify your system’s voltage before installation. The 1F86-344 is not compatible with line voltage systems (120V or 240V). Furthermore, it’s best suited for systems without advanced features like zoning or multi-stage operation. While it can handle systems with gas, oil, and electric heating, complex configurations may require a more advanced thermostat. Always consult a qualified HVAC technician if you are unsure about compatibility.

Replacing the 1F86-244 Model

The White-Rodgers 1F86-344 is specifically designed as a direct replacement for the 1F86-244 model. This simplifies the upgrade process, as the wiring configuration remains identical, utilizing the same terminals: RC, C, RH, W, Y, G, O, and B. No rewiring is typically needed, minimizing installation time and complexity.

However, carefully verify the existing wiring before disconnecting the old thermostat. Taking a picture of the current connections is highly recommended. The 1F86-344 offers the same basic functionality as its predecessor – non-programmable, single-stage control – but may have slight cosmetic differences. Ensure the new thermostat is securely mounted and all wire connections are firm to guarantee proper operation.

Finding Replacement Parts

Locating replacement parts for the White-Rodgers 1F86-344 thermostat generally involves contacting HVAC supply stores or online retailers specializing in thermostat components. While the 1F86-344 is a relatively simple, non-programmable unit, certain parts may eventually require replacement due to wear and tear.

Commonly needed replacements might include the battery (if applicable) or, in rare cases, the entire thermostat body. Ferguson Home is a known supplier of White-Rodgers products. Searching online using the model number (1F86-344) will yield numerous options. Always verify compatibility before purchasing, and consider checking the Emerson website for authorized distributors.

Manual Resources and Downloads

Access official installation and operation manuals online via ManualsLib and the Internet Archive, including a French language version for broader accessibility.

Accessing the Official Installation and Operation Manual

Locating the official White-Rodgers 1F86-344 manual is straightforward. Several online resources provide downloadable PDF versions, ensuring easy access for installation and troubleshooting. ManualsLib hosts the 1F86-344 installation and operation instructions manual, readily available for viewing or download.

Furthermore, the Internet Archive offers a digitized copy, potentially including historical versions or related documentation. A French language manual is also accessible through the Internet Archive, catering to a wider user base. These resources provide comprehensive guidance, covering everything from initial setup to advanced configuration.

Remember to save these instructions for future reference, as they contain critical information for maintaining your HVAC system effectively. Direct links to these resources can often be found through HVAC parts retailers like Ferguson Home, which also provides specification sheets.

Online Resources and Support

Beyond the downloadable manuals, numerous online resources offer support for the White-Rodgers 1F86-344 thermostat. Thermostat.guide provides a direct download link for the installation and operation instructions, simplifying access to essential documentation. Various HVAC forums and communities host discussions where users share experiences and solutions to common issues.

Ferguson Home, a retailer of the thermostat, offers additional links to manufacturer warranties and related White-Rodgers products, expanding available support options. Searching online for “White-Rodgers 1F86-344 troubleshooting” yields a wealth of information, including videos and articles addressing specific problems.

Emerson, the parent company of White-Rodgers, may offer direct support through their website. Remember to utilize these resources for efficient problem-solving and optimal thermostat performance.

French Language Manual Availability

A French language version of the White-Rodgers 1F86-344 installation and operation manual is readily accessible online. The Internet Archive hosts a downloadable copy, providing support for French-speaking users or those preferring instructions in that language. This resource ensures broader accessibility to the thermostat’s functionality and safe operation.

Accessing the French manual is straightforward through the Internet Archive’s platform, allowing users to borrow and stream the document digitally. This is particularly useful for individuals unfamiliar with technical terminology in English, facilitating a clearer understanding of the installation and operational procedures.

The availability of a French translation demonstrates White-Rodgers’ commitment to inclusivity and customer support, catering to a diverse user base.

Warranty Information

White-Rodgers provides warranty details for the 1F86-344 thermostat, offering coverage against manufacturing defects. Contact customer support for specific terms and claim procedures.

White-Rodgers Warranty Details

The White-Rodgers 1F86-344 thermostat is covered by a limited warranty, protecting against defects in materials and workmanship under normal use. This warranty typically begins from the date of original purchase, as evidenced by a valid proof of purchase. The duration of the warranty can vary, so it’s crucial to consult the official documentation for specifics.

Generally, the warranty covers repair or replacement of the defective thermostat, at White-Rodgers’ discretion. It does not cover damage resulting from improper installation, misuse, abuse, accidents, or unauthorized modifications. Labor costs associated with replacement or repair are also typically excluded.

To make a warranty claim, you’ll need to contact White-Rodgers customer support with your proof of purchase and a detailed description of the defect. They will guide you through the process and provide instructions for returning the thermostat, if required. Always retain your purchase receipt for warranty purposes.

Contacting Customer Support

For assistance with your White-Rodgers 1F86-344 thermostat, several customer support avenues are available. Direct contact can be made through Emerson’s (the parent company of White-Rodgers) official website, where a comprehensive FAQ section and troubleshooting guides are readily accessible.

A dedicated phone support line is also provided for more immediate assistance. Response times may vary depending on call volume. Online chat support is often available, offering a convenient way to connect with a representative in real-time.

When contacting support, have your thermostat model number (1F86-344) and date of purchase readily available. A clear description of the issue you’re experiencing will expedite the troubleshooting process. Referencing the manual can also help you articulate the problem effectively.

honeywell pro 5000 installation manual

Honeywell Pro 5000 Installation Manual: Article Plan

This document outlines the comprehensive installation process for the Honeywell Pro 5000 security system‚ covering components‚ wiring‚ programming‚ and troubleshooting steps.

The Honeywell Pro 5000 is a robust and versatile security system designed for both residential and commercial applications. This manual provides detailed instructions for a successful installation‚ ensuring optimal performance and reliability. It covers everything from initial planning and component identification to advanced programming and system testing.

Understanding the system’s capabilities and following these guidelines will empower installers to create a secure and customized solution for end-users‚ maximizing the benefits of this advanced security technology.

System Components Overview

The Honeywell Pro 5000 system comprises several key components working in unison to provide comprehensive security. These include the central control panel‚ which serves as the system’s brain‚ and various keypad options for user interaction. A range of sensors – door‚ window‚ and motion detectors – provide intrusion detection.

Optional communication modules‚ like Ethernet/IP‚ enhance connectivity. Proper understanding of each component’s function is crucial for a streamlined and effective installation process.

2.1 Control Panel

The control panel is the central hub of the Honeywell Pro 5000 system‚ managing all connected devices and security functions. It houses the system’s processor‚ memory‚ and communication interfaces. This unit receives signals from sensors‚ interprets them‚ and initiates appropriate responses‚ such as activating alarms or notifying monitoring services.

Proper mounting and secure wiring are essential for reliable operation. The panel requires a dedicated power supply and backup battery for uninterrupted functionality.

2.2 Keypad Options

The Honeywell Pro 5000 supports various keypad options‚ offering flexible user interaction. Choices include hardwired keypads for direct connection to the control panel and wireless keypads for convenient placement without wiring. Keypads allow arming/disarming the system‚ programming user codes‚ and viewing system status.

Consider the desired level of accessibility and aesthetic preferences when selecting keypads. Proper mounting height and location are crucial for ease of use.

2.3 Sensor Types (Door‚ Window‚ Motion)

The Honeywell Pro 5000 utilizes diverse sensor types for comprehensive protection. Door and window sensors detect unauthorized entry via magnetic contact switches. Motion detectors employ passive infrared (PIR) technology to sense movement within a defined area. Dual-technology sensors combine PIR with microwave technology to minimize false alarms.

Selecting the appropriate sensor type depends on the specific application and environmental factors. Proper placement is vital for optimal performance.

Pre-Installation Considerations

Before commencing installation‚ careful planning is crucial for a successful Honeywell Pro 5000 setup. Assess the property’s layout to determine optimal sensor and keypad locations. Verify adequate wireless signal strength throughout the premises. Confirm compatibility with existing wiring and infrastructure.

Review local regulations regarding alarm system installation and permits. Obtain necessary approvals before proceeding with the installation process.

3.1 Tools Required

Successful Honeywell Pro 5000 installation necessitates specific tools. Essential items include a digital multimeter for voltage testing‚ wire strippers and crimpers for secure connections‚ a drill with various bits for mounting‚ and a screwdriver set.

A level ensures proper keypad alignment‚ while a cable tester verifies wiring integrity. Consider a network cable tester if utilizing Ethernet/IP modules. Safety glasses are paramount for eye protection during drilling.

3.2 Wiring Diagrams & Standards

Adhering to wiring diagrams is crucial for a functional Honeywell Pro 5000 system; Diagrams detail power supply connections‚ sensor wiring‚ and keypad integration. Follow NEC (National Electrical Code) standards for safe and compliant installations.

Utilize appropriate gauge wiring for specified distances. Proper grounding is essential for system stability and to prevent electrical hazards. Always consult the official Honeywell documentation for the latest wiring schematics.

Control Panel Mounting & Wiring

Securely mount the Honeywell Pro 5000 control panel in a central‚ accessible location‚ avoiding extreme temperatures and moisture. Ensure adequate space for wiring and future servicing. Connect the power supply‚ observing correct polarity‚ and install the backup battery for uninterrupted operation.

Properly route and label all wiring‚ following the provided diagrams. Verify all connections before powering on the system to prevent damage.

4.1 Location Selection

Choosing the right location for the Pro 5000 control panel is crucial. Select a central‚ dry‚ and easily accessible spot within the protected premises. Avoid areas prone to extreme temperatures‚ humidity‚ or potential physical damage. Ensure sufficient space around the panel for wiring and future maintenance access.

Consider proximity to a power outlet and communication lines for optimal functionality.

4.2 Power Supply Connection

Connect the Pro 5000’s power supply to a dedicated‚ grounded 120V AC outlet. Verify the voltage matches the panel’s requirements before connecting. Use appropriate wiring gauge and secure connections to prevent power interruptions. Always disconnect power before working with wiring.

Double-check polarity and ensure a stable power source for reliable system operation.

4.3 Back-up Battery Installation

Install a fully charged‚ compatible back-up battery into the designated compartment within the control panel. Ensure correct polarity when connecting the battery terminals – reversing polarity can cause damage. The battery provides power during outages‚ maintaining system functionality.

Regularly test the battery to confirm its charge level and operational readiness for uninterrupted security.

Keypad Installation & Configuration

Mount the keypad in a convenient‚ accessible location near an entry/exit point‚ ensuring it’s within the system’s wiring range. Connect the keypad wiring to the control panel‚ following the provided wiring diagram. After installation‚ access the programming mode to configure user access codes.

Establish a master code and individual user codes for authorized access and system control.

5.1 Mounting the Keypad

Select a central‚ easily accessible indoor location for the keypad‚ avoiding direct sunlight or moisture exposure. Utilize the provided mounting template to mark and drill pilot holes for secure attachment. Ensure proper wire routing before fully securing the keypad to the wall.

Confirm level alignment and tighten mounting screws for a stable installation.

5.2 Programming Access Codes

Access the system programming mode using the master access code‚ typically pre-set or defined during initial setup. Carefully program a unique master code‚ and then create individual user codes with varying access levels – arming‚ disarming‚ or limited functions.

Record all codes securely and avoid easily guessable combinations. Regularly update codes for enhanced security.

Sensor Installation Procedures

Securely mount door and window sensors‚ ensuring proper alignment for reliable contact detection. Optimize motion sensor placement‚ avoiding direct sunlight or heat sources that can trigger false alarms.

Wire sensors to the control panel following the provided wiring diagrams‚ verifying correct polarity. Test each sensor individually after installation to confirm functionality and communication with the system.

6.1 Door & Window Sensor Placement

Strategically position door and window sensors on all exterior access points‚ ensuring the sensor and magnet are closely aligned when the door or window is closed. Maintain a maximum gap of ½ inch between the sensor components for optimal performance.

Avoid metal frames that may interfere with the wireless signal. Securely attach sensors using screws or adhesive tape‚ preventing tampering or accidental dislodgement.

6.2 Motion Sensor Optimization

Maximize motion sensor effectiveness by mounting them in corners‚ approximately 7-8 feet high‚ providing a wide field of view. Avoid direct sunlight‚ heat sources‚ and air vents‚ which can trigger false alarms.

Adjust sensitivity settings based on the environment; higher sensitivity for larger areas‚ lower for pet-prone zones. Regularly test sensor coverage to ensure complete protection and minimize blind spots.

System Programming & Configuration

Configure the Honeywell Pro 5000 through the control panel or remotely via compatible software. Zone programming defines sensor locations and alarm types. User code management establishes unique access codes with varying privilege levels.

Customize entry/exit delays‚ alarm responses‚ and communication settings. Regularly review and update programming to reflect changes in security needs and ensure optimal system performance and reliability.

7.1 Zone Programming

Zone programming defines each sensor’s location and function within the Honeywell Pro 5000 system. Assign zones to specific areas – doors‚ windows‚ motion detectors – and configure their alarm types: instant‚ entry delay‚ or exit delay.

Proper zone configuration is crucial for accurate alarm identification and response. Utilize the control panel interface to customize zone names and attributes‚ ensuring clear and effective system monitoring.

7.2 User Code Management

User code management establishes secure access to the Honeywell Pro 5000 system. Create unique‚ multi-digit codes for each authorized user‚ assigning specific privilege levels – master‚ arm/disarm‚ or guest.

Regularly update and manage user codes to maintain system security. The control panel allows for easy addition‚ deletion‚ and modification of user access‚ preventing unauthorized system control and ensuring peace of mind.

Communication Modules (Optional)

Enhance your Honeywell Pro 5000 system with optional communication modules. These modules enable remote access and monitoring via Ethernet/IP connectivity‚ allowing for system control and alarm notifications through a network connection.

Installation involves connecting the module to the control panel and configuring network settings. This expands system functionality‚ providing convenient remote management and integration with smart home platforms for increased security.

8.1 Ethernet/IP Module Setup

To set up the Ethernet/IP module‚ begin by physically installing it into the designated slot within the Honeywell Pro 5000 control panel. Next‚ connect the module to your network using a standard Ethernet cable. Access the system programming menu and navigate to the communication settings.

Configure the module with a static IP address or enable DHCP for automatic assignment. Verify connectivity by pinging the module from a computer on the same network.

Troubleshooting Common Installation Issues

Common issues include power-up failures; verify the transformer and battery connections are secure. Sensor communication errors often stem from wiring faults or low batteries – check zone programming. If the keypad isn’t responding‚ confirm proper wiring and access code entry. Network connectivity problems require checking Ethernet cable connections and IP address settings.

Review the system logs for detailed error messages to pinpoint the root cause and implement corrective actions.

9.1 Power-Up Problems

If the control panel fails to power on‚ first verify the AC transformer is securely connected and providing the correct voltage. Check the back-up battery connection; a failing battery can prevent start-up. Inspect the power supply fuse for any breaks or damage. Confirm wiring connections are tight and correct‚ referencing the wiring diagram.

A completely discharged battery may require extended charging before the system powers up.

9.2 Sensor Communication Errors

If sensors aren’t communicating‚ begin by checking the wireless sensor battery levels. Ensure sensors are within the system’s wireless range and aren’t obstructed by metal or thick walls. Verify the sensor’s enrollment in the system via programming. Inspect wiring for hardwired sensors‚ looking for breaks or loose connections.

Interference from other devices can also cause communication issues.

System Testing & Verification

Thorough testing confirms proper system functionality after installation. Perform a complete walk test‚ activating each sensor to verify signal transmission to the control panel. Confirm alarm signals are correctly reported to the monitoring station‚ if applicable. Verify all programmed zones are responding as intended.

Document all test results for future reference and troubleshooting.

10.1 Walk Test Procedure

Initiate a walk test from the control panel’s programming menu. Systematically activate each sensor – open doors/windows‚ trigger motion detectors – and confirm immediate communication with the panel. The keypad should display the zone number corresponding to the activated sensor.

Record any failures or delays during the walk test for immediate correction and re-testing.

10.2 Alarm Verification

After the walk test‚ simulate alarm events to verify central station communication. Trigger each zone and confirm the panel transmits the correct alarm signal. Monitor the central station receiver for accurate zone identification and alarm type.

Document all verification results‚ noting any discrepancies. False alarms or communication failures require immediate troubleshooting and correction before system activation.

Honeywell Pro 5000 System Limitations

The Honeywell Pro 5000’s effectiveness relies on proper installation and maintenance. Wireless signals can be affected by interference or obstructions‚ potentially causing delays or failures. Power outages necessitate functional backup batteries.

This system isn’t a guarantee against all forms of intrusion; it’s a deterrent. Environmental factors and user error can also impact performance. Regular testing is crucial.

Regulatory Compliance Information

The Honeywell Pro 5000 system adheres to various regulatory standards‚ including FCC Part 15 for radio frequency devices and UL standards for safety. Installation must comply with local codes and ordinances regarding alarm systems.

Proper grounding and wiring are essential for compliance. Modifications without Honeywell’s approval may void certifications and potentially create safety hazards. Refer to the full compliance documentation.

Warranty Information

Honeywell provides a limited warranty for the Pro 5000 system‚ covering defects in materials and workmanship for a specified period from the date of purchase. This warranty typically excludes damage from improper installation‚ misuse‚ or unauthorized modifications.

To claim warranty service‚ retain your proof of purchase and contact Honeywell’s customer support. Full warranty details‚ including limitations and exclusions‚ are available in the product documentation.

Frequently Asked Questions (FAQ)

Common questions regarding the Honeywell Pro 5000 installation often involve zone programming‚ user code creation‚ and sensor compatibility. Users frequently inquire about troubleshooting communication errors and resolving power-up issues.

Detailed answers to these and other frequently asked questions can be found on Honeywell’s support website‚ alongside helpful video tutorials and downloadable resources to assist with the installation process.

Resources & Support

For comprehensive assistance with your Honeywell Pro 5000 installation‚ Honeywell provides a wealth of resources. These include detailed installation guides‚ programming manuals‚ and troubleshooting documents available for download on their official website.

Additionally‚ a dedicated technical support team is available via phone and online chat to address specific questions and provide expert guidance throughout the installation process‚ ensuring a smooth setup.

Safety Precautions During Installation

Prioritize safety during Honeywell Pro 5000 installation. Always disconnect power before working with wiring to prevent electrical shock. Utilize appropriate personal protective equipment‚ including safety glasses and gloves.

Securely mount all components to prevent falls. Be mindful of ladder safety when accessing elevated areas. Properly dispose of packaging materials and follow all local electrical codes for a safe and compliant installation.

noco genius gen pro 10×3 manual

Discovering diverse, plant-derived proteins is increasingly vital, mirroring a growing trend towards health-conscious diets and sustainable food choices, as of January 2026.

The Rising Popularity of Plant-Based Diets

A significant shift towards plant-based eating is demonstrably underway, gaining momentum since 2023 and accelerating through 2025 and 2026. This surge isn’t merely a fleeting trend; it reflects evolving consumer awareness regarding health, environmental sustainability, and ethical considerations. Articles from January and December 2025, and January 2026, highlight a growing interest in alternatives to traditional animal protein sources.

Driven by concerns about the impact of animal agriculture, individuals are actively seeking diets rich in plant-derived nutrients. This includes not just vegetarians and vegans, but also “flexitarians” who consciously reduce their meat consumption. The accessibility of information, coupled with innovative plant-based product development, further fuels this dietary revolution, making it easier than ever to embrace a more plant-forward lifestyle.

Why Focus on Plant-Based Protein?

Prioritizing plant-based protein offers a multitude of benefits extending beyond simply meeting nutritional needs. Articles from March and April 2025, and January and February 2026, emphasize the health advantages, including reduced risk of heart disease, type 2 diabetes, and certain cancers. Plant proteins are often lower in saturated fat and cholesterol compared to animal proteins, contributing to improved cardiovascular health.

Furthermore, plant-based diets generally have a smaller environmental footprint, requiring less land, water, and energy to produce. Focusing on plant proteins also encourages dietary diversity, leading to a wider intake of essential vitamins, minerals, and fiber. Clever combinations, as noted in several sources, ensure complete amino acid profiles, rivaling those found in animal products, making it a sustainable and healthful choice.

Top Plant-Based Protein Sources

Explore a vast array of protein-rich plants, including legumes, soy products, and grains, offering versatile options for a balanced and nutritious diet, as of 2023;

Legumes: A Protein Powerhouse

Legumes stand out as exceptionally valuable protein sources within plant-based diets, offering a substantial nutritional profile alongside their protein content. These versatile foods, including lentils, chickpeas, kidney beans, black beans, and pinto beans, are not only affordable and filling but also contribute significantly to overall health. They are packed with essential nutrients like fiber, iron, and folate, making them a cornerstone of many healthy eating plans.

Clever combination is key for those embracing a legume-focused approach, ensuring a complete amino acid intake. As highlighted in recent articles from January and December 2025/2026, incorporating a variety of legumes into your meals is crucial for optimal nutrition, providing a sustainable and delicious path to meeting your protein needs without relying on animal products.

Lentils: Versatile and Nutrient-Rich

Lentils truly embody versatility in the kitchen, seamlessly integrating into soups, stews, salads, and even vegetarian “meat” sauces. Beyond their culinary adaptability, lentils are remarkably nutrient-rich, boasting a high protein content alongside substantial amounts of fiber, iron, and folate. Articles from January and February 2026 emphasize their importance in plant-based diets, particularly for those seeking to cover their protein needs without animal products.

Their affordability and ease of preparation further enhance their appeal, making them an accessible protein source for a wide range of individuals. Combining lentils with grains, as suggested by nutritional guidance, ensures a complete amino acid profile, maximizing their nutritional benefits and supporting overall well-being.

Chickpeas: Beyond Hummus

While famously known as the star ingredient in hummus, chickpeas offer a far broader culinary range than many realize. These legumes are incredibly versatile, lending themselves to roasting for a crunchy snack, adding texture to salads, or serving as a hearty base for vegetarian curries and stews. Information surfacing in late January and early February 2026 highlights their rising prominence in plant-based meal planning.

Nutritionally, chickpeas are a powerhouse, delivering a significant dose of protein, fiber, and essential minerals. Like lentils, they benefit from strategic combination with grains to create complete protein sources, ensuring optimal amino acid intake. Their affordability and long shelf life make them a practical staple for health-conscious consumers.

Beans (Kidney, Black, Pinto): Affordable and Filling

Kidney, black, and pinto beans represent a cornerstone of budget-friendly, plant-based nutrition. Data from late 2025 and early 2026 consistently emphasizes their accessibility and substantial nutritional value. These legumes are exceptionally filling due to their high fiber content, promoting satiety and aiding in weight management. Beyond their economic benefits, they contribute significantly to a diverse and balanced diet.

Protein-wise, beans are a reliable source, though, like other plant proteins, they benefit from combination with grains or other complementary sources to ensure a complete amino acid profile. They’re incredibly adaptable, featuring in chili, soups, stews, and even bean burgers, making them a versatile pantry staple.

Soy Products: Complete Protein Options

Soy-based foods stand out as exceptional plant protein sources, uniquely offering a “complete” protein profile – containing all nine essential amino acids. Recent reports from January and February 2026 highlight soy’s nutritional completeness, making it a valuable choice for those following plant-based diets. This completeness simplifies meal planning, reducing the need for meticulous protein combining.

Popular options like tofu, tempeh, and edamame provide versatility in the kitchen. Tofu’s neutral flavor allows it to absorb marinades beautifully, while tempeh’s fermentation process adds a nutty depth. Edamame serves as a convenient and satisfying snack. Soy’s affordability further enhances its appeal as a protein staple.

Tofu: Adaptable and Widely Available

Tofu’s remarkable adaptability stems from its nearly flavorless profile, allowing it to seamlessly integrate into diverse culinary creations. Reports from late 2025 and early 2026 consistently emphasize tofu’s versatility, noting its ability to mimic textures ranging from silky smooth to firm and chewy. This makes it ideal for stir-fries, scrambles, desserts, and even blended into smoothies for a protein boost.

Furthermore, tofu’s widespread availability and relatively low cost contribute to its popularity. Found in most supermarkets, it’s an accessible protein source for individuals on various budgets. Different firmness levels cater to specific recipes – silken for creamy textures, firm for grilling or frying. Tofu truly embodies convenience and culinary flexibility.

Tempeh: Fermented and Flavorful

Tempeh distinguishes itself from other soy products through a unique fermentation process, utilizing soybeans bound together with edible fungus. This fermentation not only enhances its digestibility but also imparts a distinct, slightly nutty flavor profile, frequently highlighted in articles from January and February 2026. Unlike tofu, tempeh possesses a firmer, chewier texture, making it excellent for marinating, grilling, or crumbling into sauces.

Moreover, the fermentation process boosts tempeh’s nutritional value, increasing its vitamin B12 content and providing beneficial probiotics. It’s a complete protein source, offering all essential amino acids. Tempeh’s robust flavor and texture make it a satisfying and nutritious alternative to meat, appealing to those seeking flavorful plant-based options.

Edamame: A Delicious Snack

Edamame, young soybeans harvested before maturity, presents a convenient and enjoyable way to incorporate plant-based protein into your diet. Often enjoyed steamed or boiled and lightly salted, edamame serves as a satisfying snack or a vibrant addition to salads and stir-fries, as noted in reports from late 2025 and early 2026. Its bright green color and slightly sweet flavor make it appealing to a wide range of palates.

Beyond its taste, edamame is a nutritional powerhouse, rich in protein, fiber, and essential vitamins and minerals. It’s also a good source of folate and vitamin K. Whether enjoyed in pods or shelled, edamame offers a quick and healthy protein boost, fitting seamlessly into a busy lifestyle.

Grains & Seeds: Adding Protein to Your Meals

Incorporating grains and seeds is a fantastic strategy to subtly boost the protein content of your everyday meals. While not as protein-dense as legumes or soy, these additions contribute valuable nutrients and enhance the overall nutritional profile of your diet, according to dietary analyses from January and February 2026. They offer versatility and can be easily integrated into various dishes.

These plant-based staples aren’t just about protein; they also provide essential fiber, healthy fats, and vital micronutrients. Utilizing grains and seeds allows for a more balanced and complete nutritional intake, supporting overall health and well-being. Exploring options like quinoa, chia, and hemp seeds unlocks a world of flavor and nutritional benefits.

Quinoa: A Complete Protein Grain

Quinoa stands out as a remarkable grain, celebrated for being a “complete protein,” meaning it contains all nine essential amino acids – a rare feat in the plant kingdom, as highlighted in reports from April 2025. This makes it an excellent protein source for individuals following plant-based diets, ensuring they receive the full spectrum of amino acids necessary for optimal health and bodily functions.

Beyond its complete protein profile, quinoa is also a good source of fiber, iron, magnesium, and antioxidants. Its mild, slightly nutty flavor and fluffy texture make it incredibly versatile in the kitchen, lending itself well to salads, side dishes, or even breakfast bowls. Quinoa’s nutritional benefits and culinary adaptability solidify its position as a cornerstone of plant-based nutrition.

Chia Seeds: Small but Mighty

Despite their diminutive size, chia seeds pack a powerful nutritional punch, emerging as a significant contributor to plant-based protein intake, as noted in articles from December 2025. These tiny seeds are an excellent source of protein, fiber, omega-3 fatty acids, and various micronutrients, offering a wealth of health benefits in a small package.

Chia seeds are incredibly versatile and easy to incorporate into your diet. They can be added to smoothies, yogurt, oatmeal, or used as a thickening agent in puddings. Their ability to absorb liquid creates a gel-like consistency, making them a popular ingredient in chia seed pudding. Regularly consuming chia seeds supports digestive health, heart health, and sustained energy levels.

Hemp Seeds: A Nutritional Boost

Hemp seeds represent a complete protein source, containing all nine essential amino acids – a rare and valuable trait among plant-based options, highlighted in reports from January 2026. Beyond protein, they are rich in omega-3 and omega-6 fatty acids in an ideal ratio for human health, alongside essential minerals like magnesium, iron, and zinc. This comprehensive nutrient profile makes hemp seeds a true “nutritional boost” for any diet.

Their mild, nutty flavor makes them easily adaptable to various dishes. Sprinkle them on salads, yogurt, or oatmeal, blend them into smoothies, or incorporate them into baked goods. Hemp seeds don’t require cooking and can be enjoyed raw, maximizing their nutritional benefits. They contribute to heart health, reduce inflammation, and support overall well-being.

Combining Plant Proteins for Optimal Nutrition

Strategic combination of plant proteins ensures complete amino acid profiles, vital for maximizing nutritional benefits, as emphasized by dietary experts in March 2025.

The Importance of Amino Acid Profiles

Proteins are constructed from amino acids, and the human body requires nine essential amino acids it cannot produce independently. Plant-based proteins, while nutritious, don’t always contain all nine in sufficient quantities – this is where understanding amino acid profiles becomes crucial. Different plant sources excel in different amino acids; for example, legumes are rich in lysine but often lower in methionine, while grains provide more methionine but may lack lysine.

Therefore, relying on a single plant protein source can lead to deficiencies. A varied diet, thoughtfully combining different plant proteins, ensures you obtain all essential amino acids necessary for optimal health, muscle repair, and overall bodily functions. This concept of ‘complementary proteins’ is key to thriving on a plant-based diet, as highlighted by nutritional guidance from January 2026.

Complementary Protein Combinations

Achieving a complete amino acid profile doesn’t require meticulous meal planning; simply combining different plant proteins throughout the day is often sufficient. Classic examples include pairing legumes (like lentils or beans) with grains (such as rice or quinoa). This combination effectively balances lysine and methionine, providing all essential amino acids.

Other successful pairings involve combining seeds with legumes, or grains with nuts and seeds. Even a simple meal of peanut butter on whole-wheat bread offers a complementary protein source. The key is variety – consistently incorporating a range of plant-based proteins into your diet ensures adequate intake of all essential amino acids, supporting optimal health and well-being, as emphasized in recent nutritional reports from January 2026.

Practical Tips for Incorporating Plant Protein

Start small, swapping meat for lentils once a week, and gradually explore diverse plant proteins for flavorful, nutritious, and sustainable meals, as of February 2026.

Meal Planning with Plant-Based Proteins

Effective meal planning is crucial for successfully integrating plant-based proteins into your diet. Begin by dedicating time each week to outline your meals, focusing on incorporating a variety of protein sources like legumes, tofu, tempeh, quinoa, and seeds. Consider batch cooking grains and legumes to save time during the week.

Plan meals around complementary protein combinations to ensure you’re obtaining all essential amino acids. For example, pairing rice and beans creates a complete protein. Utilize online resources and recipe databases for inspiration, searching specifically for plant-based protein recipes. Don’t be afraid to experiment with different flavors and cuisines to keep your meals exciting.

Remember to account for snacks! Nuts, seeds, and edamame make excellent protein-rich snacks. Preparing a grocery list based on your meal plan will streamline your shopping and reduce impulse purchases. Finally, be flexible and adjust your plan as needed based on your preferences and schedule.

Recipe Ideas for Protein-Rich Plant-Based Meals

Explore a world of flavorful possibilities with these protein-packed plant-based meal ideas! Start with a hearty lentil soup, brimming with vegetables and spices – a comforting and nutritious option. For a quick weeknight dinner, try tofu stir-fry with brown rice and a colorful array of veggies. Black bean burgers, served on whole-wheat buns with avocado, offer a satisfying and protein-rich alternative to traditional burgers.

Quinoa salads, featuring chickpeas, chopped vegetables, and a lemon-tahini dressing, are perfect for lunch or a light dinner. Tempeh bacon BLTs, using smoky tempeh strips, provide a plant-based twist on a classic. Don’t forget breakfast – chia seed pudding with berries and nuts is a delicious and protein-filled way to start your day.

Experiment with Indian dals, utilizing various lentils and spices for a flavorful protein boost. These recipes demonstrate how easy and delicious incorporating plant proteins can be!